


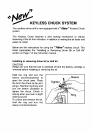
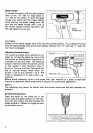


NOTE
:
0
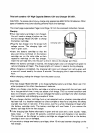
Make sure that the driver bit
is
inserted straight in
the
screw head, or the screw and/or
bit may be damaged.
3.5 (9164")
3.8 (5132")
4.5 111164"l
When driving wood screws, predrill pilot
Nominal diameter
of
I
Recommended size
2.2
-
2.5 (3132''
-
3/32")
2.5
-
2.8 (3132''
-
7/64',)
2.9
-
3.2 (7164"
-
118")
holes to make driving easier. and to pre-
wood Screw
("1
I
of
pilot
hole
In"
3.1 (118")
I
2.0
-
2.2 (5164''
-
3/32")
vent splitting of the workpiece.
See
the
4.8 (3116")
5.1 (13164")
5.5 17/32',)
-
chart.
3.1
-
3.4 (118''
-
9164")
3.3
-
3.6 (118"
-
9/64',)
3 7
-
3.9 19164"
-
5/32',)
5.8 17/32',)
6.1 115164")
I
4.2
-
4.4 11 1/64"
-
11/64',)
I
4.0
-
4.2 15/32''
-
11/64")
I
4.4
-
4.6 I1 1/64"
-
6/32',)
6.4 1114")
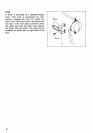
Drilling operation
First, turn the adjusting ring
so
that the pointer on the adjusting ring points to the
-\-
marking. Then proceed
as
follows.
0
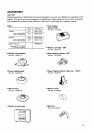
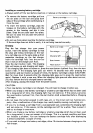
Drilling in wood
When drilling in wood, best results are obtained with wood drills equipped with
a
guide
screw. The guide screw makes drilling easier by pulling the bit into the workpiece.
To prevent the bit from slipping when starting
a
hole, make an indentation with
a
center-
punch and hammer
at
the point to be drilled place the point of the bit in the indenta-
tion and start drilling.
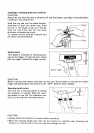
Use
a
cutting lubricant when drilling metals. The exceptions are iron and brass which
should be drilled dry.
0
Drilling in metal
CAUTION
:
*Pressing excessively on the tool will not speed up the drilling. In fact, this excessive
pressure will only serve to damage the tip of your bit, decrease the tool performance
and shorten the service life of the tool.
*There
is
a
tremendous force exerted on the tool/bit
at
the time of hole breakthrough.
Hold the tool firmly and exert care when the bit begins to break through the workpiece.
A stuck bit can be removed simply by setting the reversing switch to reverse rotation in
orderto back out. However, the tool may back out abruptly if you do not hold
it
firmly.
0
Always secure small workpieces in
a
vise
or similar hold-down device.
Overload protector
The overload protector automatically cuts out to break the circuit whenever heavy work
is
prolonged.
Wait
20
-
30
seconds before resuming operation.
CAUTION
:
Always withdraw the tool from the workpiece before resuming operation. If the tool
cannot be withdrawn, hold the tool firmly when turning on the tool, to overcome
a
strong reaction.
9