


5
25. Keep handles dry, clean and free from oil and
grease.
SPECIFIC SAFETY RULES
GEB017-1
DO NOT let comfort or familiarity with product
(gained from repeated use) replace strict
adherence to screwdriver safety rules. If you use
this tool unsafely or incorrectly, you can suffer
serious personal injury.
1. Hold power tools by insulated gripping surfaces
when performing an operation where the cutting
tool may contact hidden wiring or its own cord.
Contact with a “live” wire will make exposed metal
parts of the tool “live” and shock the operator.
2. Always be sure you have a firm footing. Be sure
no one is below when using the tool in high loca-
tions.
3. Hold the tool firmly.
4. Keep hands away from rotating parts.
5. Do not touch the bit or the workpiece immedi-
ately after operation; they may be extremely hot
and could burn your skin.
SAVE THESE INSTRUCTIONS.
WARNING:
MISUSE or failure to follow the safety rules stated
in this instruction manual may cause serious per-
sonal injury.
OPERATING INSTRUCTIONS
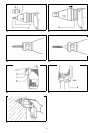
Removing or installing the bit (Fig. 1)
Important:
Always be sure that the tool is switched off and
unplugged before removing or installing the bit.
To remove the bit, first pull the stopper out of the locator.
Then grasp the bit with a pair of pliers and pull the bit out
of the magnetic bit holder. Sometimes, it helps to wiggle
the bit with the pliers as you pull. To install the bit, push
the bit firmly into the magnetic bit holder. Then install the
stopper by pushing it firmly into the locator.
Depth adjustment (Fig. 2, 3 & 4)
Push the locking sleeve in toward the motor and turn
slightly clockwise to lock it.
Turn the locator to adjust the depth. Initially, adjust the
locator so that the tip of the locator is flush with the base
of the screw head. One full turn of the locator equals 1.5
mm change in depth. After adjusting the locator, unlock
the locking sleeve. Turn the locking sleeve slightly so that
the protrusions on the locking sleeve engage in the
notches in the locator. Drive a trial screw into your mate-
rial or a piece of duplicate material. If the depth is not
suitable for the screw, continue adjusting until the proper
depth setting is obtained.
NOTE:
Before starting your job, always test-drive a sample
screw into a piece of the installation workpiece so that
you are sure to have the right depth and desired adjust-
ment.
Switch action (Fig. 5)
CAUTION:
Before plugging in the tool, always check to see that the
switch trigger actuates properly and returns to the “OFF”
position when released.
To start the tool, simply pull the trigger.tool speed is
increased by increasing pressure on the trigger. Release
the trigger to stop. For continuous operation, pull the trig-
ger and then push in the lock button. To stop the tool from
the locked position, pull the trigger fully, then release it. A
speed control screw is provided so that maximum tool
speed can be limited (variable). Turn the speed control
screw clockwise for higher speed, and counterclockwise
for lower speed.
NOTE:
Even with the switch on and motor running, the bit will not
rotate until you fit the point of the bit in the screw head
and apply forward pressure to engage the clutch.
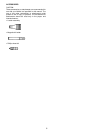
Reversing switch action (Fig. 6)
CAUTION:
• Always check the direction of rotation before operation.
• Use the reversing switch only after the tool comes to a
complete stop. Changing the direction of rotation
before the tool stops may damage the tool.
This tool has a reversing switch to change the direction of
rotation. Move the reversing switch lever to the “FWD”
position for clockwise rotation or the “REV” position for
counterclockwise rotation.
Operation (Fig. 7)
Fit the screw on the point of the bit and place the point of
the screw on the surface of the workpiece to be fastened.
Apply pressure to the tool and start it. Withdraw the tool
as soon as the screw bottoms out.
CAUTION:
• Use the proper bit for the head of the screw that you
wish to use.
• When fitting the screw onto the point of the bit, be care-
ful not to push in on the screw. If the screw is pushed
in, the clutch will engage and the screw will rotate sud-
denly. This could damage a workpiece or cause an
injury.
NOTE:
Make sure that the bit is inserted straight in the screw
head, or the screw and/or bit may be damaged.
MAINTENANCE
CAUTION:
Always be sure that the tool is switched off and
unplugged before carrying out any work on the tool.
To maintain product safety and reliability, repairs, mainte-
nance or adjustment should be carried out by a Makita
Authorized Service Center.