


10
ASSEMBLY
CAUTION:
• Always be sure that the tool is switched off and the
battery cartridge is removed before carrying out any
work on the tool.
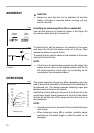
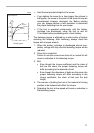
Installing or removing driver bit or socket bit
Use only the driver bit or socket bit shown in the figure. Do
not use any other driver bit or socket bit.
To install the bit, pull the sleeve in the direction of the arrow
and insert the bit into the sleeve as far as it will go. Then
release the sleeve to secure the bit.
To remove the bit, pull the sleeve in the direction of the arrow
and pull the bit out firmly.
NOTE:
• If the bit is not inserted deep enough into the sleeve, the
sleeve will not return to its original position and the bit
will not be secured. In this case, try re-inserting the bit
according to the instructions above.
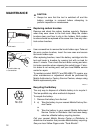
OPERATION
The proper fastening torque may differ depending upon the
kind or size of the screw/bolt, the material of the workpiece to
be fastened, etc. The relation between fastening torque and
fastening time is shown in the figures.
Hold the tool firmly and place the point of the driver bit in the
screw head. Apply forward pressure to the tool to the extent
that the bit will not slip off the screw and turn the tool on to
start operation.
NOTE:
• Use the proper bit for the head of the screw/bolt that you
wish to use.
• When fastening screw M8 or smaller, carefully adjust
pressure on the switch trigger so that the screw is not
damaged.
12 mm
(15/32”)
9 mm
(3/8”)
001266
1. Bit
2. Sleeve
1 2
001267
M12(1/2”)
M10(3/8”)
M8(5/16”)
80
60
40
20
0
(14)
(29)
(58)
(43)
1.0 2.0 3.0
N.m
Standard bolt
(ft.lbs)
M12(1/2”)
M10(3/8”)
M8(5/16”)
(s)
Fatening time
Fastening torque
Proper fastening torque
002795