


6
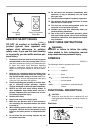
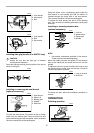
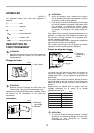
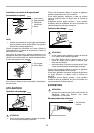
Installing side grip (handle) (For 9227CY only)
CAUTION:
• Always be sure that the side grip is installed
securely before operation.
Screw the side grip securely on the position of the tool as
shown in the figure.
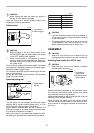
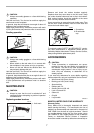
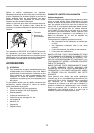
Installing or removing the wool bonnet
(optional accessory)
To install the wool bonnet, first remove all dirt or foreign
matter from the backing pad. Press the shaft lock and
screw the backing pad onto the spindle. Insert the sleeve
18 into the center hole of the backing pad.
Using the sleeve 18 as a positioning guide, install the
wool bonnet on the backing pad with the sleeve 18
inserted through the center hole of the wool bonnet.
Then remove the sleeve 18 from the backing pad.
To remove the wool bonnet, just tear it off the backing
pad. Then unscrew the backing pad while pressing the
shaft lock.
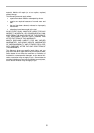
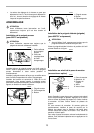
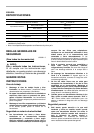
Installing or removing abrasive disc
(optional accessory)
NOTE:
• Use sander accessories specified in this manual.
These must be purchased separately.
Mount the rubber pad onto the spindle. Fit the abrasive
disc on the rubber pad and screw the lock nut onto the
spindle.
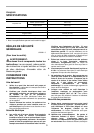
To tighten the lock nut, press the shaft lock firmly so that
the spindle cannot revolve, then use the lock nut wrench
and securely tighten clockwise.
To remove the disc, follow the installation procedure in
reverse.
OPERATION
Polishing operation
1. Loop handle
2. Hex wrench
3. Bolt
1. Loop handle
2. Bolt
3. Hex wrench
1. Wool bonnet
2. Sleeve 18
3. Backing pad
4. Spindle
5. Shaft lock
1
2
3
003449
11
3
2
003450
003805
1
2
3
4
5
003467
1. Lock nut
2. Abrasive disc
3. Rubber pad
4. Spindle
1. Lock nut wrench
2. Shaft lock
1
4
2
3
003457
1
2
003458
003478