


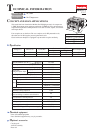
P 6/ 7
Repair
[2] REPLACING
[2]-4. Sheet ring H, Leaf spring H, Wearing H (cont.)
[2]-5. Sheet ring L, Leaf spring L, Wearing L
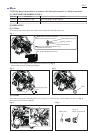
1) Assemble Wearing H to Piston H. Wear ring H is not directional in assembling.
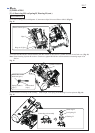
2) Insert Ring spring H in Sheet ring H so that the clearance of Ring spring H faces the opposite side against the clearance
of Sheet ring H. (Fig. 15)
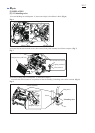
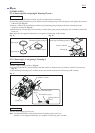
3) Enlarge a width of the assembled part of Sheet ring H and Ring spring H slightly and fit the assembled part into
the groove of Piston H. (Fig. 16)
4) When Piston H of Connecting rod H assembly is at dead center upper point by turning Fan 195, assemble Cylinder H to
Crank case.
Note: Piston H is not supplied individually. It is supplied as Connecting rod H assembly.
Fig. 15
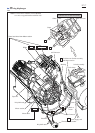
Fig. 17
Fig. 16
ASSEMBLING
DISASSEMBLING
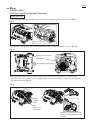
1) Remove Pipe 8 from two Elbows. (Fig. 12)
2) Loosen four M6x90 Hex socket head bolts with Hex wrench 5, and then remove Cylinder L section from Crank case.
(Fig. 17)
3) Disassembling Connecting rod L assembly in the same manner mentioned for Connecting rod H assembly.
Take the disassembling step in reverse.
Note: 1) Tighten M6x90 Hex socket head bolt to the fastening torque 8 to 10 N.m.
2) Piston L is not supplied individually. It is supplied as Connecting rod L assembly.
M6x90 Hex socket head bolt
(4pcs.)
Flat washer 6 (4pcs.)
Spring washer 6
(4pcs.)
Crank case
ASSEMBLING
Sheet ring H
Ring spring H
Clearance of Ring spring H
Clearance of Sheet ring H Wearing H
Groove of Piston
The assembled part of
Sheet ring H and Ring spring H
Cylinder L section