


7
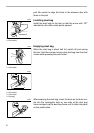
Refer to the figure for the relationship between the number
settings on the adjusting dial and the kind of work.
A range: For polishing
B range: For finish sanding
C range: For regular sanding
NOTE:
• The figure shows standard applications. They may differ
under certain conditions.
CAUTION:
• If the tool is operated continuously at low speeds for a
long time, the motor will get overloaded, resulting in tool
malfunction.
• The speed adjusting dial can be turned only as far as 5
and back to 1. Do not force it past 5 or 1, or the speed
adjusting function may no longer work.
ASSEMBLY
CAUTION:
• Always be sure that the tool is switched off and
unplugged before carrying out any work on the tool.
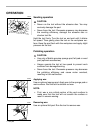
Front grip
Install the front grip on the tool so that its protrusions fit into
the matching notches in the front of the tool. Secure the front
grip using a screwdriver to tighten the screw through the hole
in the front grip.
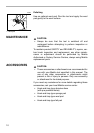
Installing or removing abrasive disc
CAUTION:
• Always use hook-and-loop system abrasive discs. Never
use pressure-sensitive abrasive discs.
To install the abrasive disc, first remove all dirt or foreign mat-
ter from the pad. Then attach the abrasive disc to the pad,
using the hook-and-loop system of the abrasive disc and the
1
23
Dial setting
Orbits per minute
4000
12000
45
A
B
C
003291
1. Notches
2. Front grip
3. Screwdriver
4. Hole in front grip
43
1
2
003296
003301