


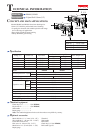

P 3 / 8
[3] DISASSEMBLY/ASSEMBLY
[3] -1. Drill Chuck
Repair
DISASSEMBLING
ASSEMBLING
Fastening
Loosening
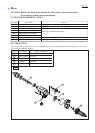
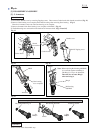
1) Secure 1R139 firmly with Vise as illustrated in Fig. 2.
2) Fix Spindle on 1R139 by inserting Spindle into the U-shaped notch on 1R139 with the flat sides of the Spindle
facing the edges of the notch. And then remove Drill chuck by turning it counterclockwise with 1R223, 1R224 and
1R298. (Fig. 3)
Use Pipe wrench to remove the Drill chuck, if the sleeve of Drill chuck does not turn because of some troubles
with Drill chuck. Grip the periphery of the sleeve with wrench, and turn wrench counterclockwise.
The keyed Drill chuck of DP4010 can be removed using a Wrench 43 (781024-2).
Fig. 3
1R223
1R224
1R298
1R139
17.0mm (11/16")
8419B
8406
8406C
8420V
HP2031
DP4700
6310
UT2201
6300-4
6013BR
6300LR
6300L
When fastening the Drill chuck to the Spindle, set the torque of 1R223 to 35.7 to 45.9 N.m.
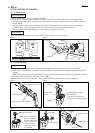
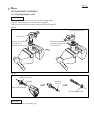
1) Remove three 4x35 Tapping screws, and Separate Gear housing from Gear housing cover complete. (Fig. 4)
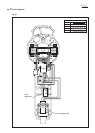
2) Remove Ball bearing 608ZZ from Spindle with 1R269 (Fig. 5) and pull out Gear complete with Ball bearing 606ZZ.
(Fig. 6)
Note: Gear complete with Ball bearing 606ZZ can not be pulled out without removing Ball bearing 608ZZ in advance.
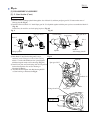
3) After removing Lock plate, pull off Change lever B. (Fig. 7)
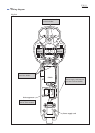
4) Remove Spur gear 29-37 from Spindle. Change plate B, Rack 12 and Pin 4 can be removed. (Fig. 8).
Fig. 2
Fig. 4
1R139
Vise
Vise
[3] -2. Gear Section
DISASSEMBLING
4x35 Tapping screw: 3 pcs.
Gear housing
Gear housing cover complete
Fig. 5
Fig. 6 Fig. 7
Lock plate
Change lever B
Gear complete with
Ball bearing 606ZZ
Ball bearing
608ZZ
Gear complete with Ball
bearing 606ZZ
(A part of Gear complete is
caught on Ball bearing 608ZZ.)
1R269
Spindle
Pin 4
Change plate B
Spur gear 29-37
Spindle
Rack 12
Fig. 8
Note: Do not disassemble
the Gear complete,
because it has torque
limiter function and
requires difficult
adjustment when
reassembled.