


9
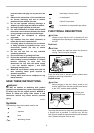
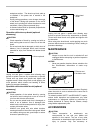
In general, keep the edge of the wheel or disc at an angle
of about 15 degrees to the workpiece surface.
During the break-in period with a new wheel, do not work
the grinder in the B direction or it will cut into the
workpiece. Once the edge of the wheel has been
rounded off by use, the wheel may be worked in both A
and B direction.
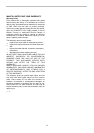
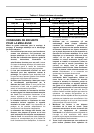
Operation with abrasive cut-off / diamond
wheel (optional accessory)
1
3
2
4
010799
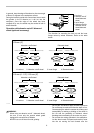
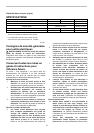
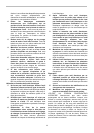
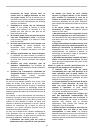
The direction for mounting the lock nut and the inner
flange varies by wheel thickness. Refer to the table
below.
Abrasive cut-off wheel Diamond wheel
Thickness: Less than 4 mm (5/32") Thickness: 4 mm (5/32") or more
16 mm (5/8")
20 mm (13/16")
22.23 mm (7/8")
Abrasive cut-off wheel
Diamond wheel
Thickness: Less than 4 mm (5/32") Thickness: 4 mm (5/32") or more
Thickness: Less than 4 mm (5/32") Thickness: 4 mm (5/32") or more Thickness: Less than 4 mm (5/32") Thickness: 4 mm (5/32") or more
22.23 mm (7/8")
22.23 mm (7/8") 22.23 mm (7/8")
16 mm (5/8")
20 mm (13/16")
1
2
3
1
4
3
100 mm (4")
115 mm (4 - 1/2") / 125 mm (5")
1
2
3
1
4
3
1. Lock nut 2.Abrasive cut-off wheel 3. Inner flange 4. Diamond wheel
1. Lock nut 2.Abrasive cut-off wheel 3. Inner flange 4. Diamond wheel
010848
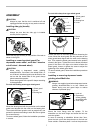
WARNING:
• When using an abrasive cut-off / diamond wheel,
be sure to use only the special wheel guard
designed for use with cut-off wheels.
• NEVER use cut-off wheel for side grinding.
• Do not "jam" the wheel or apply excessive pressure.
Do not attempt to make an excessive depth of cut.
Overstressing the wheel increases the loading and
susceptibility to twisting or binding of the wheel in
the cut and the possibility of kickback, wheel
breakage and overheating of the motor may occur.
• Do not start the cutting operation in the workpiece.
Let the wheel reach full speed and carefully enter
into the cut moving the tool forward over the
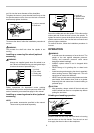
1. Lock nut
2. Abrasive cut-off
wheel/diamond
wheel
3. Inner flange
4. Wheel guard for
abrasive cut-off
wheel/diamond
wheel