


8
Torque limiter
The torque limiter will actuate when a certain torque level
is reached. The motor will disengage from the output
shaft. When this happens, the bit will stop turning.
CAUTION:
As soon as the torque limiter actuates, switch off the tool
immediately. This will help prevent premature wear of the
tool.
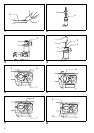
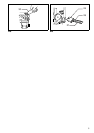
Chipping/Scaling/Demolition (Fig. 16)
Set the change lever and the shift lever to the
g
symbol.
Hold the tool firmly with both hands. Turn the tool on and
apply slight pressure on the tool so that the tool will not
bounce around, uncontrolled. Pressing very hard on the
tool will not increase the efficiency.
Drilling operation (Fig. 17)
Use the optional drill chuck assembly. When installing it,
refer to “Installing or removing drill bit” described on the
previous page. You can drill up to 13mm diameter in
metal and up to 30mm diameter in wood.
Set the change lever and the shift lever to the symbol.
• Drilling in wood
When drilling in wood, best results are obtained with
wood drills equipped with a guide screw. The guide
screw makes drilling easier by pulling the bit into the
workpiece.
• Drilling in metal
To prevent the bit from slipping when starting a hole,
make an indentation with a centerpunch and hammer
at the point to be drilled. Place the point of the bit in the
indentation and start drilling.
Use a cutting lubricant when drilling metals. The excep-
tion is brass which should be drilled dry.
CAUTION:
• Pressing excessively on the tool will not speed up the
drilling. In fact, this excessive pressure will only serve
to damage the tip of your bit, decrease the tool perfor-
mance and shorten the service life of the tool.
• Never use “rotation with hammering” when the drill
chuck assembly is installed on the tool. The drill chuck
assembly may be damaged.
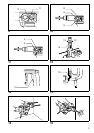
Depth gauge (Fig.18)
The depth gauge is convenient for drilling holes of uni-
form depth. Loosen the clamp screw and adjust the
depth gauge to the desired depth. After adjusting, tighten
the clamp screw firmly.
NOTE:
The depth gauge cannot be used at the position where
the depth gauge strikes against the gear housing/motor
housing.
Indicator lamp (Fig. 19)
The green power-ON indicator lamp lights up when the
tool is switched ON. If the indicator lamp is lit but the tool
does not start, the carbon brushes may be worn out, or
the electric circuit or the motor may be defective. If the
indicator lamp does not light up and the tool does not
start, the ON/OFF switch or the mains cord may be
defective.
The red service indicator lamp lights up when the carbon
brushes are nearly worn out to indicate that the tool
needs servicing. After approx. 8 hours of use, the motor
will automatically be shut off.
MAINTENANCE
CAUTION:
Always be sure that the tool is switched off and
unplugged before carrying out any work on the tool.
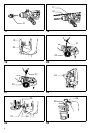
Replacement of carbon brushes (Fig. 20& 21)
Whenever carbon brushes must be replaced, they cut out
the tool automatically. When this occurs, remove the
screws which secure the brush holder cover. Remove the
brush holder cover and brush holder cap. Then replace
both carbon brushes at the same time. Use only identical
carbon brushes.
Lubrication
This tool requires no hourly or daily lubrication because it
has a grease-packed lubrication system. Lubricate the
tool every time the carbon brushes are replaced.
Run the tool for several minutes to warm it up. Switch off
and unplug the tool.
Loosen the six screws and remove the handle. Note that
the top screws are different from other screws. (Fig. 22)
Disconnect the connector by pulling it. (Fig.23)
Remove the crank cap using a hex wrench. (Fig.24)
Rest the tool on the table with the bit end pointing
upwards. This will allow the old grease to collect inside
the crank housing. Wipe out the old grease inside and
replace with a fresh grease (30 g). Use only Makita genu-
ine hammer grease (optional accessory). Filling with
more than specified amount of grease (approx. 30 g) can
cause faulty hammering action or tool failure. Fill only
with the specified amount of grease. Reinstall the crank
cap and tighten with the hex wrench. (Fig. 25)
Connect the connector and reinstall the handle. (Fig.26)
CAUTION:
• Be careful not to damage the terminals or lead wires
especially when wiping out the old grease or installing
the handle.
• Do not tighten the crank cap excessively. It is made of
resin and is subject to breakage.
To maintain product safety and reliability, repairs, mainte-
nance or adjustment should be carried out by a Makita
Authorized Service Center.
ACCESSORIES
CAUTION:
These accessories or attachments are recommended for
use with your Makita tool specified in this manual. The
use of any other accessories or attachments might
present a risk of injury to persons. Only use accessory or
attachment for its stated purpose.
If you need any assistance for more details regarding
these accessories, ask your local Makita service center.
• SDS Plus Tungsten-carbide tipped bit
• Bull point
• Cold chisel
• Hammer grease (30 g)
• Bit grease (100 g)
• Depth gauge
• Blow-out bulb
•Dust cup
• Safety goggles
• Drill chuck
• Chuck key S13
• Plastic carrying case
• Side grip