


8
For RD1100 and RD1101
CAUTION:
• Before plugging in the tool, always check to see that the
switch trigger actuates properly and returns to the “OFF”
position when released.
• Switch can be locked in “ON” position for ease of
operator comfort during extended use. Apply caution
when locking tool in “ON” position and maintain firm
grasp on tool.
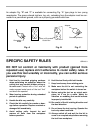
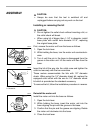
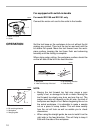
After connecting the motor unit cord to the outlet in the han-
dle, move the switch lever to the “ON” position.
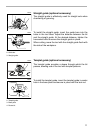
To start the tool, simply pull the switch trigger. Release the
switch trigger to stop.
For continuous operation, pull the switch trigger and then
push in the lock button.
To stop the tool from the locked position, pull the switch trig-
ger fully, then release it.
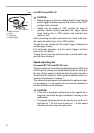
Speed adjusting dial
For model RF1101 and RD1101 only
The tool speed can be infinitely adjusted between 8,000 and
24,000 rpm by turning the speed adjusting dial on the top of
the tool. Higher speed is obtained when the dial is turned in
the direction of number 6; lower speed is obtained when it is
turned in the direction of number 1.
This allows the ideal speed to be selected for optimum mate-
rial processing, i.e. the speed can be correctly adjusted to
suit the material and bit diameter.
CAUTION:
• If the tool is operated continuously at low speeds for a
long time, the motor will get overloaded, resulting in tool
malfunction.
• The speed adjusting dial can be turned only as far as 6
and back to 1. Do not force it past 6 or 1, or the speed
adjusting function may no longer work.
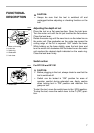
1. Motor unit cord
2. Outlet
3. Lock button
4. Switch trigger
1
2
3
4
003663