


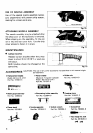

FOR
THE
CORRECT
PLANER BLADE SETTING
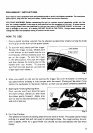
Your planing surface will end up unsmooth and not
level,
unless
the
blade
is
set
properly
and securely. The
blade
must be mounted
so
that the cutting edge
is
absolutely level, that
is,
parallel to the surface
of
the rear base. Below are some examples of proper and im-
proper settings.
(A)
Front
base
(Movable
shoe)
Although
this
side
view
cannot
show
it,
the
edges
of
the
blades
run
perfect-
ly
parallel
to
the
rear
base
surface.
Cause
One
or
both
blades
fails
to
have
edge
parallel
to
rear
base
line.
Nicks
in
surface
Cause.
One
or
both
blade
edges
fails
to
protrude
enough
in
relation
to
rear
base
line.
Gouging
Cause
One
or
both
blade
edges
pro-
trudes
too
far
in
relation
to
rear
base
line
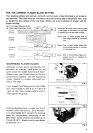
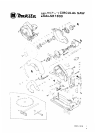
SHARPENING PLANER BLADES
Although
a
power planer considerably
out-
performs an ordinary hand plane,
by
the
same token the blades become dull faster.
Always keep your blades sharp for the best
performance possible. Use the sharpening
holder (photo)
to
remove nicks and pro-
duce
a
fine edge.
First, loosen the
2
wing nuts on the holder
and insert blades
A
and
B
as
in figure
at
ight,
so
that they contact side
C
and
D.
Then tighten wing nuts.
Immerse dressing stone in water for
2
or
3
minutes before sharpening. Grip the hold-
er
so
that blades both contact the dressing
stone for simultaneous sharpening
at
the
same angle. Stock removal
is
possible up to
7.5
mm
(5/16”).
Blades may be used down
to 24.5mm
(I”).
I
Sharpening holder
I
Fig.
7
Fig.
9
5