


ENGLISHen
10
with clean water and seek medical attention
immediately.
See page 2.
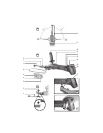
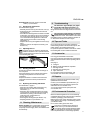
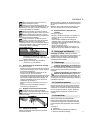
1Sanding attachment
2 Rotary knob for securing the sanding
attachment and adjusting the belt run
3Cover
4 Arrow (direction of rotation of
drive shaft
)
5 Screw for securing the
cover
6Sanding belt
7Tensioner arm for replacing the sanding belt
8 Sanding head
9
Locking screw for
adjusting sanding head
10 Additional handle
11 Sliding
on/off switch
12 Electronic signal indicator
13 B
attery pack release button
14 Capacity indicator button
15 Capacity and signal indicator
16 Battery pack
17 Dust filter
6.1 Attaching the additional handle
Always work with the additional handle
attached (10)! Attach the additional handle on
the left or right of the machine and secure. Attach
the additional handle to the side facing away from
the sanding belt (6).
6.2 Turning the sanding head (8) to
operating position
Loosen the locking screw (9) using the hexagon
spanner and, if necessary and depending on the
task at hand, turn the sanding head (8). The sanding
head must be positioned in the permitted working
area as shown (see illustration A, page 2). Firmly
tighten the locking screw (9).
Each time before you start work, verify that the
locking screw (9) is sufficiently tightened to
ensure that the sanding head (8) does not move.
Otherwise, the sanding belt (6) may come in contact
with the user. Loss of control can cause personal
injury.
6.3 Dust filter
See illustration C on page 2.
Always fit the dust filter if the surroundings are
heavily polluted (17).
The machine heats up faster when the dust
filter is fitted (17). It is protected by the
electronics system from overheating (see
chapter9.).
To fit:
See fig. page 2. Attach the dust filter (17) as shown.
To remove:
Holding the dust filter at the edges, raise it slightly
(17) and then pull it downwards and remove.
6.4 Rotating battery pack
See illustration C on page 2.
The rear section of the machine can be rotated 270°
in three stages, thus allowing the machine's shape
to be adapted to the working conditions. Only
operate the machine when it is in an engaged
position.
6.5 Battery pack
Charge the battery pack before use (16).
If performance diminishes, recharge the battery
pack.
The ideal storage temperature is between 10°C and
30°C.
"Li-Power" li-ion battery packs have a capacity and
signal indicator: (15)
- Press the button (14), the LEDs indicate the
charge level.
- If one LED is flashing, the battery pack is almost
flat and must be recharged.
6.6 Removing and inserting the battery pack
Removal:
Press the battery pack release (13) button and pull
the battery pack (16) forwards
.
Inserting:
Slide in the battery pack (16) until it engages.
7.1 On/Off switch, continuous activation
Always guide the machine with both hands.
Switch the machine on first before mounting it
on the workpiece.
The machine must not be allowed to draw in
additional dust and shavings. When switching
the machine on and off, keep it away from dust
deposits.
After switching off the machine, only place it
down when the motor has come to a standstill.
Avoid switching on the machine accidentally:
always switch it off when the battery pack is
removed from the machine.
In continuous operation, the machine
continues running if it is forced out of your
hands. Therefore, always hold the machine using
the handles provided, stand in a safe position and
concentrate.
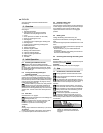
Switching on/
Continuous activation
: Push sliding
switch (11) forward. For continuous
activation, now tilt downwards until it
engages.
5. Overview
6. Initial Operation
7. Use
0
I
11