


page 6
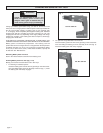
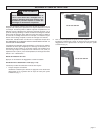
Forward (clockwise) rotation,
For Catalog Number 0501-02 — push the control switch to the left
position.
For Catalog Number 0502-02 — push the control switch towards
the symbol on the body of tool.
Check the direction of rotation before use.
Reverse (counter clockwise) rotation,
For Catalog Number 0501-02 — push the control switch to the right
position.
For Catalog Number 0502-02 — push the control switch towards
the symbol on the body of tool.
Check direction of rotation before use.
Locking the trigger,
For Catalog Numbers 0501-02 & 0502-02 — push the control switch
to center position. The trigger will not work while the control switch is in
the center locked position. Always lock the trigger or remove the bat-
tery pack before performing maintenance, changing accessories, stor-
ing the tool and any time the tool is not in use.
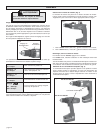
APPLICATIONS
Drilling
Set the clutch adjusting ring to the drill position. Place the bit on the work
surface and apply firm pressure before starting. Too much pressure will
slow the bit and reduce drilling efficiency. Too little pressure will cause
the bit to slide over the work area and dull the point of the bit.
If the tool begins to stall, reduce pressure slightly to allow the bit to regain
speed. If the bit binds, reverse the motor to free the bit from the workpiece.
Drilling in Wood, Composition Materials and Plastic
When drilling in wood, composition materials and plastic, start the drill
slowly, gradually increasing speed as you drill. When drilling into wood,
use wood augers or twist drill bits. Always use sharp bits. When using
twist drill bits, pull the bit out of the hole frequently to clear chips from the
bit flutes. To reduce the chance of splintering, back work with a piece of
scrap wood. Select low speeds for plastics with a low melting point.
To reduce the risk of electric shock, check
work area for hidden pipes and wires before
drilling or driving screws.
WARNING!
Drilling in Metal
When drilling in metal, use high speed steel twist drills or hole saws. Use
a center punch to start the hole. Lubricate drill bits with cutting oil when
drilling in iron or steel. Use a coolant when drilling in nonferrous metals
such as copper, brass or aluminum. Back the material to prevent binding
and distortion on breakthrough.
Driving Screws and Nut Running
Drill a pilot hole when driving screws into thick or hard materials. Set the
clutch adjusting ring to the proper position and set the speed to low. Use
the proper style and size screwdriver bit for the type of screw you are
using.
With the screwdriver bit in the screw, place the tip of the screw on the
workpiece and apply firm pressure before pulling the trigger. Screws can
be removed by reversing the motor.
Overloading
Continuous overloading may cause permanent damage to tool or battery
pack.
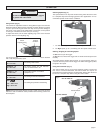
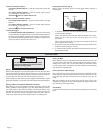
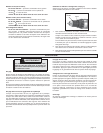
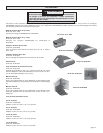
Using Keyless Chucks (Fig. 6)
Always remove the battery pack or lock the trigger before inserting or
removing bits.
Fig. 6
Sleeve
Collar
1. To open the chuck jaws, hold the collar while turning the sleeve in the
counterclockwise direction.
When using drill bits, allow the bit to strike the bottom of the chuck.
Center the bit in the chuck jaws and lift it about 1/16" off of
the bottom.
When using screwdriver bits, insert the bit far enough for the chuck
jaws to grip the hex of the bit.
2. To close the chuck jaws, hold the collar while turning the sleeve in the
clockwise direction. Tighten securely.
3. To remove the bit, hold the collar while turning the sleeve in the coun-
terclockwise direction.