


6
7
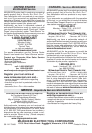
Bracing for forward rotation
C
Fig. 4
Bracing for reverse rotation
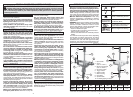
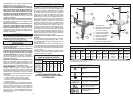
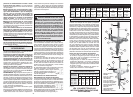
When drilling in reverse, the bit will rotate in a
counterclockwise direction. If the bit binds in the
hole, the bit will come to a sudden stop and the
drill will suddenly react in a clockwise direction.
Figure 5 shows an example of the Super Hole-
Shooter properly braced for reverse rotation.
A. Reverse (counterclockwise) rotation
B. Reaction
C. Brace drill with pipe handle here
If the bit binds, the pipe handle or the motor housing
braced against the stud will hold the drill in position.
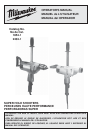
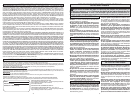
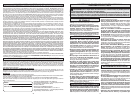
When drilling in forward, the bit will rotate in a
clockwise direction. If the bit binds in the hole, the
bit will come to a sudden stop and drill will suddenly
react in a counterclockwise direction.
Figure 4 shows an example of a Super Hole-
Shooter properly braced for forward rotation.
A. Forward (clockwise) rotation
B. Reaction
C. Brace drill with pipe handle here
If the bit binds, the pipe handle or the motor housing
braced against the stud will hold the drill in position.
B
C
A
Fig. 5
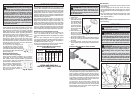
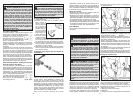
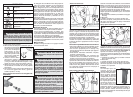
Reversing (Fig. 6)
A reversing switch is lo-
cated below the trigger
switch for removal of bits
from holes. Permit the mo-
tor to come to a complete
stop before reversing.
Reversing the tool with the
gears in motion may cause
severe damage. When
removing selfeed bits from
partially drilled holes, a
fl ick of the trigger switch will free the threaded pilot
screw. When the threads are loose, lift the bit from
the workpiece with the motor stopped.
Fig. 6
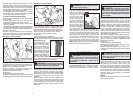
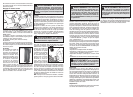
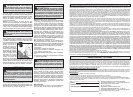
Chuck Removal
This tool is equipped with a threaded spindle to
hold the chuck. Before
removing the chuck,
unplug the tool and
open the chuck jaws.
A left-handed thread
screw is located inside
the chuck to prevent the
chuck from loosening
when the tool is oper-
ated in reverse direc-
tion. Remove the screw
by turning it clockwise.
To remove the chuck, hold the tool so that only the
side of the chuck rests fi rmly and squarely on a
solid workbench. Insert the chuck key or a chuck
remover bar in one of the keyholes. Turn the chuck
so the key is at about a 30° angle to the bench top
and strike the key sharply with a hammer so the
chuck turns in a counterclockwise direction (look-
ing from the front of the tool). This should loosen
the chuck from the spindle which has a right hand
thread making it easy to remove the chuck by hand.
NOTE: When replacing the chuck, always replace
the left hand thread screw in the chuck.
Fig. 7
WARNING
To reduce the risk of injury,
always wear eye protection.
ACCESSORIES
For a complete listing of accessories refer to your
MILWAUKEE Electric Tool catalog or go on-line
to www.milwaukeetool.com. To obtain a catalog,
contact your local distributor or a service center.
WARNING To reduce the risk of injury,
always unplug the tool before attaching or
removing accessories. Use only specifi cally
recommended accessories. Others may be
hazardous.
Maintaining Tools
Keep your tool in good repair by adopting a regular
maintenance program. Before use, examine the
general condition of your tool. Inspect guards,
switches, tool cord set and extension cord for
damage. Check for loose screws, misalignment,
binding of moving parts, improper mounting, bro-
ken parts and any other condition that may affect
its safe operation. If abnormal noise or vibration
occurs, turn the tool off immediately and have the
problem corrected before further use. Do not use a
damaged tool. Tag damaged tools “DO NOT USE”
until repaired (see “Repairs”).
Under normal conditions, relubrication is not neces-
sary until the motor brushes need to be replaced.
After six months to one year, depending on use,
return your tool to the nearest MILWAUKEE service
facility for the following:
• Lubrication
• Brush inspection and replacement
• Mechanical inspection and cleaning (gears, spin-
dles, bearings, housing, etc.)
• Electrical inspection (switch, cord, armature, etc.)
• Testing to assure proper mechanical and electrical
operation
WARNING To reduce the risk of injury,
electric shock and damage to the tool, never
immerse your tool in liquid or allow a liquid
to fl ow inside the tool.
MAINTENANCE
WARNING To reduce the risk of injury,
always unplug your tool before performing
any maintenance. Never disassemble the tool
or try to do any rewiring on the tool’s electrical
system. Contact a MILWAUKEE service facility
for ALL repairs.
Cleaning
Clean dust and debris from vents. Keep the tool
handles clean, dry and free of oil or grease. Use
only mild soap and a damp cloth to clean your
tool since certain cleaning agents and solvents
are harmful to plastics and other insulated parts.
Some of these include: gasoline, turpentine, lacquer
thinner, paint thinner, chlorinated cleaning solvents,
ammonia and household detergents containing
ammonia. Never use fl ammable or combustible
solvents around tools.
Repairs
If your tool is damaged, return the entire tool to the
nearest service center.
If the bit binds, the drill will suddenly react in the
opposite direction of the rotation of the bit. Figure
3 shows the path of reaction, (B) if the drill bit binds
while being driven in forward (A).The operator
should reduce the chances of a sudden reaction
by following the instructions listed below.
The operator should also prepare for a sudden
reaction by holding securely using the pipe handle
or bracing against a solid fi xed object.
To reduce the chance of bit binding:
• Use sharp bits. Sharp bits are less likely to bind
when drilling.
• Use the proper bit for the job. There are many
types of bits designed for specifi c purposes.
• Avoid drilling warped, wet, knotty, and or pitchy
material if possible.
• Avoid drilling in material that you suspect contains hid-
den nails or other things that may cause the bit to bind.
The direction of reaction is always opposite of the
direction of bit rotation.
Reaction is even more likely to occur when enlarg-
ing already existing holes and at the point when the
bit breaks through the other side of the material.
Drilling
Before drilling, clamp the material down securely.
A poorly secured piece of material may result in
personal injury or inaccurate drilling. When drilling
in light gauge metal or wood, use a wooden block
to back up the material to prevent damage to the
workpiece.
Mark the center of the hole to be drilled with a
center punch to give the bit a start and to prevent
it from "walking." Lubricate the drill bit with cutting
oil when drilling iron or steel. Use a coolant when
drilling nonferrous metals such as copper, brass or
aluminum.
WARNING To reduce the risk of electric
shock, check work area for hidden pipes and
wires before drilling or driving screws.