4
OPERATION
WARNING Toreducetheriskofinjury,
wearsafetygogglesorglasseswithside
shields.
WARNING Alwaysremovebattery
packbeforechangingorremovingac-
cessories.Onlyuseaccessoriesspecically
recommendedforthistool.Othersmaybe
hazardous.
FuelGauge
To determine the amount of charge left in the bat-
tery, turn the tool ON. The Fuel Gauge will light up
for 2-3 seconds. To signal the end of charge, the
fuel gauge will ash 6 times and the tool will not
run. Charge the battery pack.
If the battery becomes too hot, the fuel gauge lights
will ash 6 times and the tool will shut down. If the
battery is too hot when the tool is turned on, the
fuel gauge will ash once and the tool will not run.
Allow the battery to cool down.
TriggerLock
Tolock the trigger, push the trigger lock to display
the lock
symbol. The trigger will not work while the
switch is in the locked position. Lock the trigger when
storing the tool and when the tool is not in use.
To unlock the trigger, push the trigger lock to
display the unlock symbol.
MAINTENANCE
WARNING Toreducetheriskofpersonal
injuryanddamage,neverimmerseyour
tool,batterypackorchargerinliquidorallow
aliquidtoowinsidethem.
WARNING Toreducetheriskofinjury,
alwaysunplugthechargerandremovethe
batterypackfromthechargerortoolbeforeper-
forminganymaintenance.Neverdisassemble
thetool,batterypackorcharger.Contacta
MILWAUKEEservicefacilityforALLrepairs.
MaintainingTool
Keep your tool, battery pack and charger in good
repair by adopting a regular maintenance program.
After six months to one year, depending on use,
return the tool, battery pack and charger to a
MILWAUKEE service facility for:
• Lubrication
• Mechanical inspection and cleaning (gears,
spindles, bearings, housing, etc.)
• Electrical inspection (battery pack, charger,
motor)
• Testing to assure proper mechanical and
electrical operation
If the tool does not start or operate at full power
with a fully charged battery pack, clean the contacts
on the battery pack. If the tool still does not work
properly, return the tool, charger and battery pack,
to a MILWAUKEE service facility for repairs.
Cleaning
Clean dust and debris from charger and tool
vents. Keep tool handles clean, dry and free of oil
or grease. Use only mild soap and a damp cloth
to clean the tool, battery pack and charger since
certain cleaning agents and solvents are harmful to
plastics and other insulated parts. Some of these
include gasoline, turpentine, lacquer thinner, paint
thinner, chlorinated cleaning solvents, ammonia
and household detergents containing ammonia.
Never use flammable or combustible solvents
around tools.
Repairs
For repairs, return the tool, battery pack and char-
ger to the nearest service center listed on the back
cover of this operator's manual.
WARNING Alwayskeephandsand
body awayfromcolletandmagnetic
sleeveareaofthetool.Fastenershitbythe
anvilcancauseseriousinjuryiftheycontact
thehandsorbody.
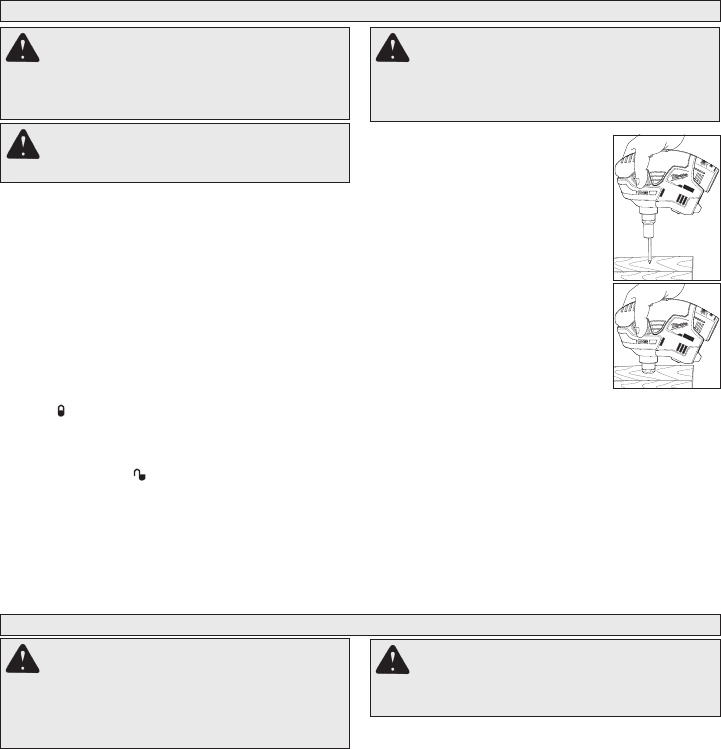
Operation
1. Insert a nail head into the mag-
netic sleeve. Note: To avoid
jams, only use nails with a head
diameter greater that 0.200".
Do not use nails with broken
heads.
2. Place the tip of the nail against
the workpiece.
3. Press the trigger button and
apply pressure to start the ham-
mering.
4. Continue to hammer until the
collet is against the workpiece
and the nail is flush with the
workpiece.
ClearingJams
Nails with very small heads (< 0.200” diameter)
or broken heads could get jammed between the
magnetic sleeve and the anvil.
1. Remove battery pack.
2. Use a pliers to grasp the end of the nail and pull
it free from the collet. It may be necessary to
retract the magnetic sleeve to grasp the nail.
3. If the nail cannot be removed with pliers, unscrew
the collet to remove the nail from the jam.


