


page 6
OPERATION
WARNING!
To reduce the risk of injury, wear safety goggles or glasses
with side shields. Unplug the tool before changing accesso-
ries or making adjustments.
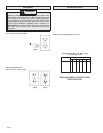
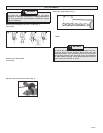
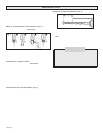
Installing Bits into Keyed Chucks (Fig. 4)
Be sure that the shank of the bit and the chuck jaws are clean. Dirt
particles may cause the bit to line up improperly. Do not use bits larger
than the maximum recommended capacity of the drill because gear dam-
age or motor overloading may result. For best performance, be sure that
the bits are properly sharpened before use.
1. Unplug the tool.
2. Open the chuck jaws wide enough to insert a bit. Allow the bit to
strike the bottom of the chuck. Center the bit in the chuck jaws and
tighten the jaws by hand to align the bit.
3. Place the chuck key into each of the three holes in the chuck, turning
it clockwise to tighten the chuck securely.
NOTE: Never use a wrench or means other than a chuck key to
tighten or loosen the chuck.
4. To remove the bit, insert the chuck key into one of the holes in the
chuck and turn it counterclockwise.
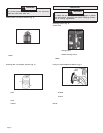
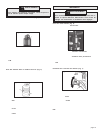
Installing Bits into Keyless Chucks (Fig. 5)
For best performance, always use sharp, clean bits and be sure the
chuck jaws are clean. Dirt particles may cause the bit to line up improp-
erly. Do not use bits larger than the maximum recommended capacity of
the drill because gear damage or motor overloading may result.
1. Unplug the tool.
2. To open the chuck jaws, turn the sleeve in the direction marked
RELEASE.
3. Allow the bit to strike the bottom of the chuck and center the bit in the
chuck jaws.
4. To close the chuck jaws, hold the collar while turning the sleeve in
the direction marked GRIP. Tighten securely.
5. To remove the bit, hold the collar while turning the sleeve in the
direction marked RELEASE.
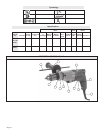
Chuck jaws
Hole for
chuck key
Fig. 4
Chuck jaws
(located behind
dust shield)
Sleeve
Fig. 5
Collar
WARNING!
To prevent personal injury, always remove the chuck key
from the chuck after each use.
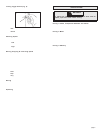
1. To select Drilling Action, pull the selector collar toward gear case
collar and rotate counter-clockwise until selector collar locks in place.
2. To select Hammer-Drilling Action, pull selector collar toward gear
case collar and rotate clockwise until selector collar locks in place.
NOTE: Constant pressure on bit must be maintained to engage ham-
mering mechanism. When pressure on bit is released, hammering
action will stop.
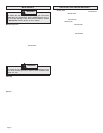
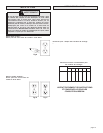
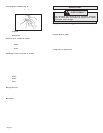
Using the Forward/Reverse Switch (Fig. 7)
Selecting Action (Fig. 6)
MILWAUKEE Hammer-Drills are designed to operate in either a "drill
only" mode or a "drilling with hammering action" mode.
The forward/reverse switch can only be adjusted when the trigger is
not pressed. Always allow the motor to come to a complete stop before
using the forward/reverse switch.
1. For forward (clockwise) rotation, push the forward/reverse switch
to FWD as shown.
2. For reverse (counterclockwise) rotation, push the forward/reverse
switch to REV as shown. Although an interlock prevents reversing
the tool while the motor is running, allow the motor to come to a full
stop before reversing.
NOTE: When hammer-drilling, use the tool in forward rotation
(clockwise) only.
Fig. 7
Forward
Trigger
Reverse
Fig. 6