


8
9
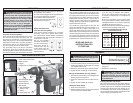
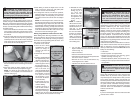
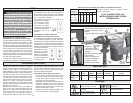
Using Rotary Percussion Core Bits
Core bits are useful for drilling larger holes for
conduit and pipe. MILWAUKEE Heavy-Duty Core
Bits have heat-treated steel bodies with durable
carbide tips. These core bits are specially designed
for fast, accurate drilling with combined hammering
and rotary action.
1. Clean and lubricate the threads on the adapter
and core bit to make later removal easier. Screw
the threaded end of the adapter into the rear of
the core bit.
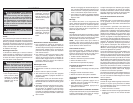
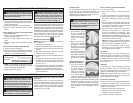
2. Push the guide plate onto the pointed end of the
center pin. Insert the center pin and guide plate
assembly into the core bit. Be sure the small end
of the center pin is securely placed into the hole
in the center of the core bit (Fig. 5).
Fig. 5
3. Insert the adapter into the nose of the tool. Set
the action selector to the hammering with rotation
setting.
4. Press the center pin fi rmly against your center
mark, hold the tool fi rmly and pull the trigger.
NOTE: If a center pin and guide plate are not
available, use a template or notched board to
start the hole (Fig. 6).
Fig. 6
5. After drilling to about the depth of the core bit
teeth, remove the center pin and guide plate
from the core bit. Resume drilling.
6. To change the core bit, hold the tool upwards,
pointing it away from your body, and run the tool
allowing rotation and impacting for about fi ve
seconds to loosen the core bit from the adapter
shank.
NOTE: To make deeper holes, remove the core
bit, break and remove the core. Resume drilling.
When drilling long or deep holes, after each inch
of penetration pull the bit partially out of the hole
while the tool is running, to help clear dust from
the bit fl utes. Dust can clog the bit fl utes and can
make the bit bind in the hole. If this occurs, stop
the tool, free the bit and begin again.
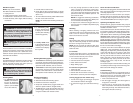
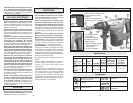
Drilling Large Diameter Holes with Core Bits
When drilling holes with large diameter core bits,
dust may build up in the cut and can cause the tool
to stall, bind, or cut slowly. By creating an opening
for the dust to escape, drilling time, bit stress, and
tool stress can be reduced.
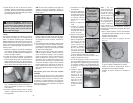
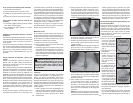
1. Start the cut as normal.
2. Once the bit is firmly
established in the cut
(about 1/4" deep), re-
move the bit from the
cut (Fig. 7).
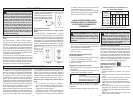
3. Remove the bit from the
tool.
4. Install a standard fl uted
bit, approximately 7/8" in
diameter, onto the tool.
5. Drill a perpendicular
hole through the kerf of
the large hole (Fig. 8).
• Depending on the loca-
tion of the work, the
hole should either break
through the other side of
the hole/fl oor or extend
4"-5" past the end of
the workpiece (such
as into the dirt below
a concrete slab).
• If dust builds up in the
hole, vacuum it out and
continue drilling.
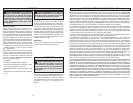
• If drilling through a
wall, the hole for dust
should be drilled on the
lowest part of the large
hole kerf (Fig. 9) as the dust will fall there when
drilling and can be evacuated more easily.
Fig. 7
Cut approximately
1/4" deep with a
core bit.
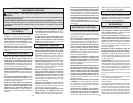
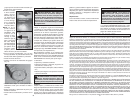
Fig. 10
Side view
of slab
Fig. 11
Pull bit out as
far as possible
once or twice
per inch drilled.
Fig. 12
WARNING Use MILWAUKEE core bits.
Do not use LHS (Large Hole System) Com-
ponents with these rotary hammers. The bits
could fail, breaking apart at the threaded stud
and causing injury and property damage.
Fig. 8
Drill a hole
through the work.
Fig. 9
Dust and debris
will fall through
the hole.
Top view
6. Reinstall the core
bit and continue
drilling (Fig. 9 &
10). Dust and
debris will fall
through the hole
and optimize the
cutting ability of
the bit.
NOTE: If unable to
drill a hole in the kerf,
pull back on the bit
with the hammer run-
ning (Fig. 11). This
will remove some of
the dust and debris
from the cut. Repeat
this for every inch of
drilling. If necessary,
vacuum dust and de-
bris from the cut and
surrounding area.
7. For core bits, once the maximum core bit
depth is drilled, the core must be broken and
removed (Fig. 12).
• Install a chisel bit.
• Place the chisel into the hole kerf.
• Chisel down into the kerf at several points until
the core is loose or broken.
• Remove the core and vacuum/remove any
remaining dust and debris.
• Install the core bit and continue the cut.
Maintaining Tools
Keep your tool in good repair by adopting a regular
maintenance program. Before use, examine the
general condition of your tool. Inspect guards,
switches, tool cord set and extension cord for
damage. Check for loose screws, misalignment,
binding of moving parts, improper mounting, bro-
ken parts and any other condition that may affect
its safe operation. If abnormal noise or vibration
occurs, turn the tool off immediately and have the
problem corrected before further use. Do not use a
damaged tool. Tag damaged tools “DO NOT USE”
until repaired (see “Repairs”).
Under normal conditions, relubrication is not neces-
sary until the motor brushes need to be replaced.
After six months to one year, depending on use,
return your tool to the nearest MILWAUKEE service
facility for the following:
• Lubrication
• Brush inspection and replacement
• Mechanical inspection and cleaning (gears,
spindles, bearings, housing, etc.)
• Electrical inspection (switch, cord, armature, etc.)
• Testing to assure proper mechanical and electri-
cal operation
Cleaning
Clean dust and debris from vents. Keep the tool
handles clean, dry and free of oil or grease. Use
only mild soap and a damp cloth to clean your tool
since certain cleaning agents and solvents are
harmful to plastics and other insulated parts. Some
of these include: gasoline, turpentine, lacquer thin-
ner, paint thinner, chlorinated cleaning solvents,
ammonia and household detergents containing
ammonia. Never use fl ammable or combustible
solvents around tools.
Repairs
If your tool is damaged, return the entire tool to the
nearest service center.
MAINTENANCE
WARNING To reduce the risk of
injury, always unplug your tool before
performing any maintenance. Never disas-
semble the tool or try to do any rewiring
on the tool’s electrical system. Contact a
MILWAUKEE service facility for ALL repairs.
WARNING To reduce the risk of injury,
electric shock and damage to the tool, never
immerse your tool in liquid or allow a liquid
to fl ow inside the tool.