


12 13
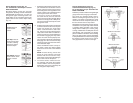
Driving Self-Drilling Screws into
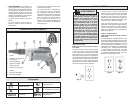
Cold-Formed Steel Framing (Fig. 13)
For Adjustable Torque Screwdrivers
Rated 0-2500 RPM
Follow this procedure when working with light
gauge sheet metal, 20 gauge and thicker.
The screw may hesitate slightly when it
fi nishes breaking through the fi rst layer of
material and starts to penetrate the sheet
metal. This is normal. Keep fi rm pressure on
the tool until the screw is fully seated.
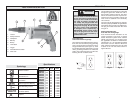
Self-drilling and self-tapping screws drill, tap
and fasten in one quick, easy motion without
a separate drilling operation. Their unique
design works in metal up to 1/2" thick, giving
a strong, reliable hold. The drill point ensures
rapid drilling and consistently low drilling
pressure while the drill fl utes remove drilling
chips. The pilot section ensures that drilling
is completed before the fi rst thread engages
the material. These screws can be used in
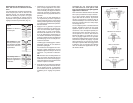
many applications as shown at the right.
Fig. 13
Corrugated siding
Wood to structure
Structure to structure
Sheet to sheet
Sheet to structure
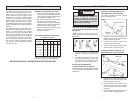
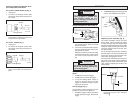
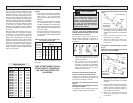
Driving Decking Screws (Fig. 12)
For Screwdrivers with Depth Locators
Rated 0-2500 RPM
Standard decking screws are generally
designed for attaching wood to wood studs.
MILWAUKEE Screwdrivers are ideal for
driving these types of decking screws. The
depth setting is very important. Refer to the
guide below for the correct depth setting
(Fig. 12).
1. Select the proper decking screw for each
job. Pilot holes are not needed. To insert
screws, place the screw onto the insert
bit, then align the screw against the work
surface, making sure to hold the tool and
screw square to the work surface.
If the tool or screw are misaligned,
the screw will not drive into the work
surface or it will not drive straight. Wood
screws have sharp points or drill points,
and course threads that help the screw
through the wood.
2. Pull the trigger and push the tool forward
to sink the screw into the wood. A quick
motion will engage the snap-action
clutch, cause the screw to start rotat-
ing, sink the screw and disengage the
snap-action clutch within a fraction of a
second. If pressure is not maintained on
the tool after engaging the snap-action
clutch, the screw will not properly seat.
The snap-action clutch will automatically
disengage and the insert bit will stop
rotating once the screw has been driven
to the selected depth.
These screwdrivers feature a snap-ac-
tion clutch, which may ratchet slightly
when the screw is sunk to the selected
depth.
NOTE: Practice driving screws into
pieces of scrap material to become
familiar with the tool and the snap-
action clutch action before attempting to
drive screws into the workpiece.
3. To remove screws, remove the loca-
tor assembly and switch the forward/
reverse switch to the reverse position.
Reattaching the locator assembly will
not change the depth setting.
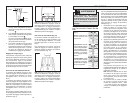
Correct. Head of
screw is below
surface.
Too deep. Head of
screw punches hole
in surface, allowing
moisture to collect.
Decrease depth.
Too shallow. Head of
screw extends above
surface. Increase
depth.
Fig. 12