


PAGE 2 OF 2
BULLETIN NO. 54-43-0061 Mar. 2008
Disassembly:
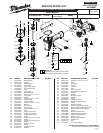
1, 2 Remove hex bolts (1) from top cap (2) using a 4mm hex key.
2, 4, 5, 6, 7 Remove valve assembly 4, 5, 6, and 7 from top cap (2) using a fl at blade screwdriver.
11, 12 Remove press ring (11) from top of cylinder (12) prior to removing driver/cylinder assemblies.
8, 9, 10, 12, 13, 14, 15,
16, 17, 36
Remove driver assembly (8, 9, 10), and cylinder assembly (12, 13, 14, and 17), from tool body (36) at the same time
by placing two fl at blade screwdrivers under ring of cylinder (12) 180° apart, and gently prying the cylinder from the tool
body.
Note: Valve bumper (17) may stay in cylinder (12) or remain in tool body (36).
15, 16, 36 Remove cylinder spacer (15) and o-ring (16) from tool body (36) by placing a fl at blade screwdriver under spacer (15) and
gently lifting spacer assembly out of the tool body (36).
57, 70, 88, 91 Remove magazine B (70) from magazine A (57) by removing screw/washer (88, 91).
29, 30, 31, 32, 33, 35, 36, Remove selector assembly (29, 30, 33, 35), and trigger assembly (31,32) from tool body (36) by placing a 3/32 in. (2.5
mm) punch inside half-moon slot of retainer (33) and gently tapping shaft of selector (29) to separate retainer (33) from
shaft (29). Remove spring (30), retainer (33) ring (35), spring, (31) and trigger (32) from tool body.
21, 22 23, 24, 25, 26, 27,
28, 36
Remove trigger valve plunger cap (28) from tool body (36) using an 8 mm wrench, and remove remaining trigger valve
components (21-27).
20, 41, 42, 48 Remove belt clip (41) from end cap (42) by removing bolts (48) and loosening set screw (20) only a few turns
counterclockwise.
42, 45 Remove defl ector (45) from end cap (42) using a fl at blade screwdriver. Note: Using excessive force will damage or
destroy defl ector.
Re-Assembly:
21, 22, 23, 24, 25, 26, 27,
28, 36
Reinstall trigger valve assembly components (21-28) into tool body (36) in order shown. Thread assembly into tool body
(36) by hand a couple of turns to insure external threads on trigger valve plunger cap (28) properly engage with internal
threads inside tool body (36). Secure assembly using an 8 mm wrench.
24, 29, 30, 31, 32, 33, 35, Reinstall selection lever assembly (29, 30, 33, 35) and trigger assembly (31 and 32) by doing the following.
•Place spring (30) onto shaft of selection lever (29).
•Position spring (31) and trigger (32) over plunger of trigger valve assembly (24).
•Insert selection lever assembly (29 and 30) into tool body (36) and align half-moon slot of retainer (33) with half-
moon shaft of selection lever (29) and snap retainer assembly (33 and 35) onto the shaft.
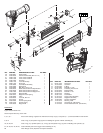
9, 36 Install fl at side of driver guide (9) towards front of tool body (36).
12, 14 Reinstall cylinder ring (14) onto cylinder (12) with large fl anged end facing the top of cylinder (12).
8, 9, 10, 12, 13, 14, 15,
16, 17, 36
Reassemble driver assembly (8, 9, 10), and cylinder assembly (12, 13, and 14) and combine the two together. Set aside.
Install cylinder spacer assembly (15, 16) and valve bumper (17) into tool body (36). Install assembly into tool body.
Note: Flat side of driver assembly (9) must face front of tool body (36).
6, 14, 19 Reinstall press ring (11) onto top of cylinder (12) with wide edge facing toward top cap (2).
2, 4, 5, 6, 7 Reinstall valve collar (4) into internal bore of top cap (2). Place upper valve spring (5) into center of valve collar (4) and push
head valve piston assembly (6 and 7) into top cap, applying suffi cient pressure to insure seal and collar fi t into position
inside top cap (2).
1, 2, 3, 36 Reinstall top cap assembly (2, 3, 4, 5, 6, and 7) onto tool body (36) using hex bolts (1).
Note: To properly seat top cap, tighten the screws at alternating corners a few turns at a time until all screws are secure.
57, 70, 88, 91 Reinstall magazine B (70) into magazine A (57) and install screw/washer (88, 91)
39, 42 Install smooth side of fi lter (39) toward end cap (42).
20, 41, 42, 48 Reassemble belt clip (41) onto end cap (42) and tighten set screw (20) until fl ush with the top thread of the clip. Install
bolts (48).
Apply Blue Loctite
®
242 to fastener threads (1), (44), (50), (58), (84) and (87).