


• 11 •
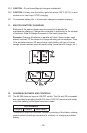
12.2 Versatile Quick-Disconnect Harness
Snap any of the three connectors into place in seconds:
12.3 Battery Clamps
Connect the clamps to the charger. Refer to sections 7 and 8 to connect
the output clamps to the battery. After a solid electrical connection is
made to the battery, plug the power cord into a 120V AC electrical wall
outlet.
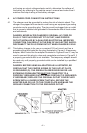
12.4 12V Accessory Plug
Charge or maintain your battery without lifting the hood. Connect the 12V
adapter to the charger and plug into the 12V accessory outlet. Route the
power cord from charger through the vehicle’s open window and plug into
a 120V AC electrical wall outlet. Make sure to place charger on a dry, non-
ammable surface, like metal or concrete.
12.5 Ring Connectors
The ring connectors permanently attach to the battery providing easy
access to quickly charge your battery. This application is appropriate for
motorcycles, lawn tractors, ATVs and snowmobiles. To permanently attach
to a battery, loosen and remove each nut from bolts at battery terminal.
Connect the red POSITIVE ring connector ring to the POSITIVE battery
terminal. Connect the black NEGATIVE connector ring to the NEGATIVE
battery terminal. Replace and tighten the nuts to secure. Take care to
keep both wires and plug away from metal and the engine hood. Plug the
power cord into a 120V AC electrical wall outlet.
13. MAINTENANCE INSTRUCTIONS
The charger is designed and built with high quality materials requiring only
a minimum amount of care.
13.1 Clamps should be cleaned each time the charger is used to prevent
corrosion from battery uid.
13.2 Cords should be coiled when the charger is not being used to prevent
damage.
13.3 Other servicing should be performed by qualied service personnel.