


• 12 •
small. The charger will stay in DESULFATION MODE for up to 24 hours,
attempting to break down the sulfation. If the battery current increases
to normal in this time, the charger will enter the normal AUTOMATIC
MODE. If the current does NOT increase to normal, the charger will enter
the ABORT state and will shut off. The rapid ashing of the RED LED
indicates the ABORT state and the battery may need to be replaced. The
charger will remain in abort until the AC power is removed.
12.6 WARNING: AT HIGHER AMP RATES, IT BECOMES EASIER TO BOIL
AND OVERCHARGE THE BATTERY. DO NOT LEAVE THE CHARGER
UNATTENDED. REFER TO THE BATTERY MANUFACTURER’S
CHARGING INSTRUCTIONS. USE THE CHARGING TIME CHART IN
SECTION 10 TO DETERMINE HOW LONG TO CHARGE.
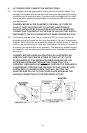
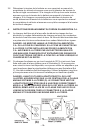
13. MOUNTING INSTRUCTIONS
13.1 The charger may be permanently mounted and connected. Six mounting
holes have been provided for secure installation. Choose a location for the
charger (see “CHARGER LOCATION” for proper placement). Using the
charger as a template, place the charger in the selected location and mark
each of the six holes with a pencil. In a well ventilated environment, drill the
six holes using a #9 (7/32”) drill bit for use with nuts and bolts OR with a
5/32” drill bit for use with #10 self tapping screws. Take caution of the area
on the other side that you are drilling to avoid drilling into wires or other
components. Using #10 bolts, nuts and lockwashers, mount the charger
with the LEDs facing up on a at vertical surface to allow for ventilation.
Route the AC and DC cords to either end and avoid pinching them under
the base. A sealant may be used to waterproof the screw holes.
13.2 NOTE: Mounting the charger horizontally may not allow excess heat to
rise away from the charger; if the charger must be mounted horizontally,
take care to ensure there is a four inch minimum clearance around all
sides of charger to provide adequate ventilation.
13.3 NOTE: This charger has an internal thermocouple. If the unit gets too
hot, the current will be reduced to allow the charger to cool to normal
operating temperatures and restart. If the unit does not cool, the charger
will temporarily shut off until normal temperatures are obtained.
14. MAINTENANCE INSTRUCTIONS
The charger is designed and built with high quality materials requiring only
a minimum amount of care.
14.1 After use, use a dry cloth to wipe all battery corrosion and other dirt or oil
from terminals, cords, and the charger case.
14.2 Cords should be coiled when the charger is not being used to prevent
damage.
14.3 Other servicing should be performed by qualied service personnel.