


8
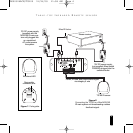
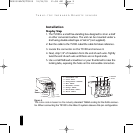
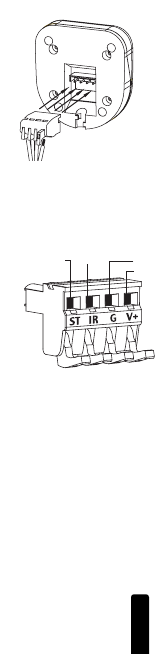
6. Insert each wire into the appropriate hole on the removable
connector plug (Figure 6), and snap the locking tab down.
To help you, the connector plug is keyed. Insert the smooth
side of the connector plug into the smooth side of the sock-
et. Don’t force the scalloped side of the connector plug into
the smooth side of the socket (Figure 5).
7. Double-check all connections. Plug the connector back into
its socket on the TS100.
Operation
Operation of the TS100 is simple. Stand within the operational
range of your TS100, aim your hand-held remote at the TS100
and press the button for the desired command. Your IR com-
mand is instantly repeated to your A/V equipment.
Green “Power Status” LED
When the TS100 is correctly connected (Figure 2), the Green
LED will stay lit as long as the preamp/receiver is on. When
your preamp/receiver is off, the LED will stay off.
Blue “Flashback” LED
The blue “flash-back” LED on the TS100 visually confirms the
reception of an IR command.
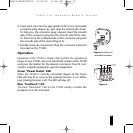
T
ABLE
-
TOP
I
NFRARED
R
EMOTE SENSOR
1 = STATUS
4 = 12V DC
2 = DATA 3 = GROUN
Figure 5 Installing the
removable connector
.
Figure 6
DS00326ACN/TS100 11/26/03 11:58 AM Page 10