


INSTALLATION
NEW HOME CONSTRUCTION
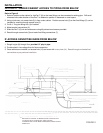
Refer to Figure 5
1. Cut out wall plate (9) between two studs at the location of VacPan™. Cut a 6 3/4" piece of wall plate and refasten to floor
temporary rough-in block. (10) This will act as temporary rough-in block that will force all trades to finish around providing
a slot in wall for installation of VacPan™. Make certain that screws (11) remain exposed so that block can be removed in
the future.
2. Flooring contractor must run flooring under block.
3. Rough-in pipe and low voltage leads (12) to location of VacPan™ outlet. Ensure final fitting is installed 1" off finished
floor with
1
/2" of play in piping to allow VacPan™ to be slid into position.
Product specifications subject to change without notice.
4820 Red Bank Road, Cincinnati, Ohio 45227
1140 Tristar Drive, Mississauga, Ontario, Canada L5T1H9
Printed in U.S.A., Rev. 3/02
FIGURE 5
FIGURE 6
1
⁄2"
FLEX
11
10
12
9
9
12
14
13
6
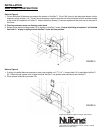
Refer to Figure 5
1. If ceiling is installed below and access to pipe is not possible, cut 2
3
/4" X 4
1
/2" access hole (13) in wall above VacPan™
(6). Reach through access hole, lift pipe and slide VacPan™ into position and push elbow onto VacPan™.
2. Cover access hole with cover plate (14).