


-
4
-
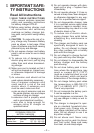
21) Charge the battery pack in a well
ventilated place, do not cover the
charger and battery pack with a
cloth, etc., while charging.
22) Use of an attachment not recom
-
mended may result in a risk of fire,
electric shock, or injury to persons.
23) Do not short the battery pack. A
battery short can cause a large cur-
rent flow, over heating and burns.
24) NOTE: If the supply cord of this ap
-
pliance is damaged, it must only be
replaced by a repair shop appoint-
ed by the manufacturer, because
special purpose tools are required.
25) TO REDUCE THE RISK OF ELEC
-
TRIC SHOCK, THIS APPLIANCE
HAS A POLARIZED PLUG (ONE
BLADE IS WIDER THAN THE
OTHER).
This plug will fit in a polarized out
-
let only one way. If the plug does
not fit fully in the outlet, reverse the
plug. If it still does not fit, contact
a qualified electrician to install the
proper outlet. Do not change the
plug in any way.
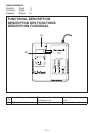
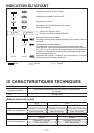
II
. CHARGING THE
BATTERY
Common Cautions
• When charging a cool battery
pack (below 0°C (32°F)) in a warm
place, leave the battery pack at the
place and wait for more than one
hour to warm up the battery to the
level of the ambient temperature.
Otherwise battery pack may not be
fully charged.
•
Cool down the charger when charging
more than two battery packs consecu-
tively.
• Do not insert your fingers into con-
tact hole, when holding charger or
any other occasions.
To prevent the risk of fire or damage
to the battery charger.
• Do not use power source from an
engine generator.
• Do not cover vent holes on the
charger and the battery pack.
• Unplug the charger when not in
use.
NOTE:
Your battery pack is not fully charg-
ed at the time of purchase. Be sure
to charge the battery before use.
Battery charger
1. Plug the charger into the AC outlet.
NOTE:
Sparks may be produced when the
plug is inserted into the AC power
supply, but this is not a problem in
terms of safety.
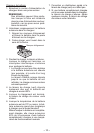
2. Insert the battery pack firmly into the
charger.
1) Line up the alignment marks and
place the battery onto the dock on
the charger.
2) Slide forward in the direction of the
arrow.
Alignment marks
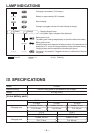
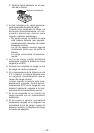
3. During charging, the charging lamp will
be lit.
When charging is completed, an inter-
nal electronic switch will automatically
be triggered to prevent overcharging.
• Charging will not start if the battery
pack is warm (for example, immedi-
ately after heavy-duty operation).
The orange standby lamp will be
flashing until the battery cools down.
Charging will then begin automati
-
cally.
4.
The charge lamp (green) will flash
slowly once the battery is approximate-
ly 80% charged.