-
9
-
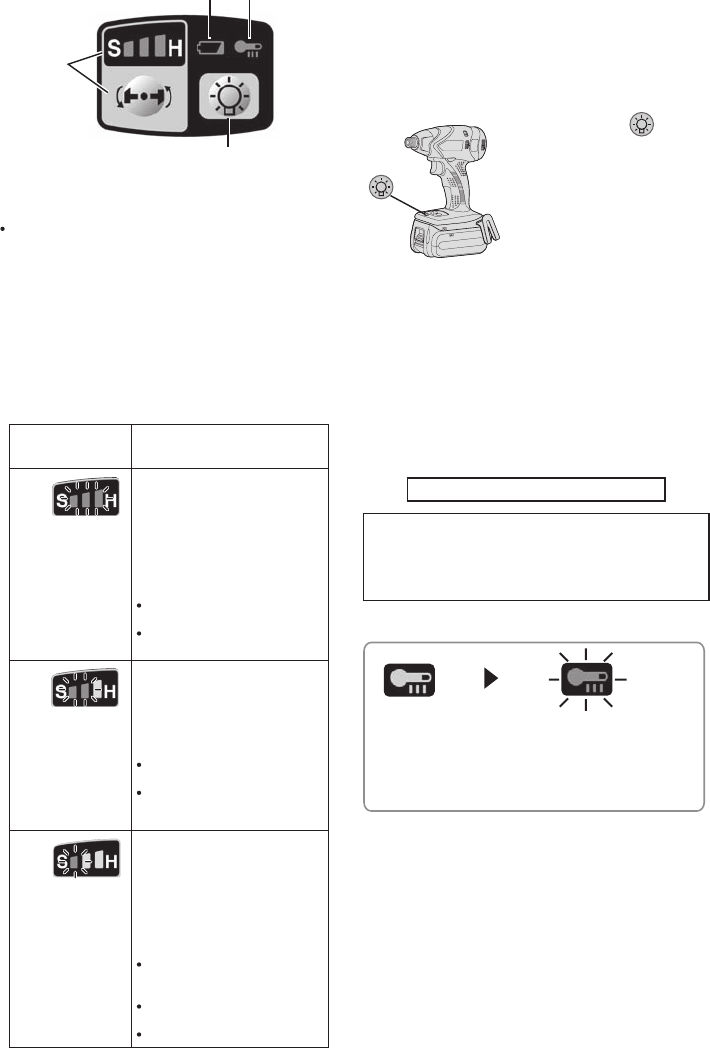
Control Panel
(1)
(2)
(4) (3)
(1) Impact Power Mode Select
Selecting the impact power among 3
modes (Soft, Medium, Hard).
Press the impact power mode button
to set it. The mode changes to hard,
medium, or soft each time the button is
pressed.
The driver is preset to “hard” impact mode
setting when shipped from the manufac-
turer.
Recommended work guideline table
Impact
Power mode
Display
Recommended Application
H
Jobs requiring a high level
of torque where there is
no possibility of the screw
breaking, its top shearing off,
or the bit coming loose. (This
setting provides maximum
torque.) Suitable applications
include:
Tightening M8 and larger
bolts
Tightening long screws
during interior finishing work
0 – 2300 r.p.m./
0 – 2500 r.p.m.
and
0 – 3000 i.p.m./
0 – 3300 i.p.m./
0 – 3500 i.p.m.
M
Jobs requiring limited torque
where there is a possibility of
the screw breaking or its top
shearing off. (This setting limits
torque.) Suitable applications
include:
Tightening bolts with
smaller diameters (M6)
Tightening metalwork
screws when installing
fixtures
0 – 1400 r.p.m.
and
0 – 2800 i.p.m.
S
Jobs requiring limited torque
where there is a possibility
of the screw breaking, its
top shearing off, or the bit
coming loose and damaging
a nished exterior surface.
(This setting limits torque.)
Suitable applications include:
Tightening bolts smaller
than M6 that may shear
easily
Tightening screws into
molded plastic
Installing gypsum wallboard
0 – 1000 r.p.m.
and
0 – 2000 i.p.m.
* i.p.m. = Impact per minute.
Avoid repeatedly depressing the switch
when the bolts and screws are securely
fastened.
Not doing so may cause a delay in
rotation starting, or the Impact Power
mode display to flash and prevent rotation
from starting for circuit protection.
(2) LED light
Pressing the but ton
tog gles the LED light on
and off.
The light illuminates with
very low current, and
it does not adversely
affect the performance
of the
driver during use
or its battery capacity.
CAUTION:
• The built-in LED light is designed to illu-
minate the small work area temporarily.
•
Do not use it as a substitute for a regu-
lar
flashlight, since it does not have
enough brightness
.
This product has the built-in LED light.
This product is classified into “Class 1 LED
Product” to IEC (EN) 60825-1:2001.
Class 1 LED Product
Caution : DO NOT STARE INTO BEAM.
Use of controls or adjustments or performance
of procedures other than those specied herein
may result in hazardous radiation exposure.
(3) Overheat warning lamp
Off (normal
operation)
Flashing: Overheat
Indicates operation has
been halted due to motor
or battery overheating.
The overheating protection feature halts
driver operation to protect the motor and
battery pack in the event of overheating.
The overheat warning lamp on the control
panel flashes when this feature is active.
• If the overheating protection feature acti-
vates, allow the driver to cool thoroughly
(at least 30 minutes). The driver is ready
for use when the overheat warning lamp
goes out.
• Avoid using the driver in a way that
causes the overheating protection fea-
ture to activate repeatedly.


