


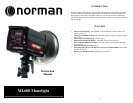


3
IMPORTANT SAFEGUARDS
In accordance with UL122 specifications for photographic equipment.
When using your photographic equipment, basic safety precautions should always be
followed, including the following:
1. Read and understand all instructions.
2. Care must be taken as burns could occur from touching the flashtube or modeling
lamp.
3. Do not operate the appliance with a damaged cord or if the appliance has been dropped
or damaged, until it has been examined by a qualified service technician.
4. If an extension cord is necessary, a cord with a suitable rating should be used. Cords
rated for less amperage than the appliance may overheat. Care should be taken to
arrange the cord so it will not be tripped over or pulled.
5. When practical, unplug the appliance from the electric outlet when not in use. Never
yank the cord to pull it from the outlet. Grasp the plug and pull to disconnect.
6. To avoid electrical shock hazard, do not disassemble this appliance, but take it to a
qualified service technician when service or repair work is required. Incorrect
reassembly could cause an electric shock hazard when the appliance is subsequently
used.
7. CAUTION – Designed for indoor use only. Do not operate outside in the rain or in
inclement weather or in the presence of standing water.
8. The use of an accessory attachment not recommended by the manufacturer may cause
a risk of fire, electric shock, or injury to persons.
9. Always connect this appliance to a grounded outlet.
10. Disconnect the unit from its source of supply before replacing the flashtube or
modeling lamp.
Warning: Changes or modifications to this unit not expressly approved by the party
responsible for compliance could void the user’s authority to operate the equipment.
Note: This equipment has been tested and found to comply with the limits for a Class A
digital device, pursuant to Part 15 of the FCC Rules. These limits are designed to provide
reasonable protection against harmful interference when the equipment is operated in a
commercial environment. This equipment generates, uses, and can radiate radio frequency
energy and, if not installed and used in accordance with the instructions, may cause harmful
interference to radio communications. Operation of this equipment in residential area is likely
to cause harmful interference in which case the user will be required to correct the interference
at their own expense.
Warning: Never operate this equipment with the flashtube cover installed. This will cause
damage to the unit due to overheating.
4
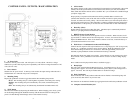
UNPACKING AND QUICK START
Carefully unpack and remove all parts from the shipping carton(s). Do not discard or destroy
any packing materials until all parts of the equipment have been inspected, assembled, and
working properly.
Inspect all parts for damage due to shipping. If any damage is found, contact the delivery
carrier immediately. Claims should be made to the delivery carrier before destroying shipping
carton(s).
Place the ML600 unit on a stable light stand that will properly support the weight of the
ML600 and any accessories that will be attached. The ML600 stand adapter is designed to
accommodate light stand tops from 3/8” to 5/8” studs. Secure the ML600 unit to the light
stand with the threaded knob.
The Modeling Lamp and Flashtube are shipped uninstalled to avoid damage. To avoid
electrical shock, always unplug unit from AC power when installing or removing modeling
lamp or flashtube. Use a clean glove or cloth to handle flashtube and modeling lamp to avoid
transfer of body oils to domes (this can significantly diminish the life of the lamp). Carefully
install the modeling lamp into the socket, push and turn the lamp until it is seated properly.
Carefully install the flashtube making sure that it is seated fully into the sockets. This avoids
arcing that can cause premature failure of the sockets.
Install the reflector to the front of the unit. Place the top of the reflector under the top lip first
and then just press the bottom into place. (The reflector should snap into place.) To remove
the reflector simply squeeze the two arms at the bottom of the unit together and swing the
reflector away from the unit.
With the ML600 power switch off, plug the AC cord into the unit and then into a 3-prong
grounded receptacle. Turn the power switch on. When the ready light turns on the unit has
reached the power level displayed on the control panel.
Flash Rate
This unit is designed to quickly recharge to full power in about 2 seconds. However,
continuous rapid flashing of the unit, without resting, may overheat and damage the flashtube
and internal components. At maximum power, the recommended continuous cycle
rate is 12
seconds between flashes. In addition, up to 4 minutes of rapid firing at a 4 second flash rate is
possible. By lowering the power and/or increasing the time between flashes you can extend
the duration of rapid flashing. Alternatively, the cycle rate may be increased by lowering the
power and/or decreasing the duration of rapid flashing.