


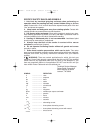
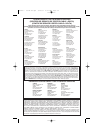

INSTALLING THE QUICK RELEASE DRUM SYSTEM
CAUTION: DISCONNECT TOOL FROM POWER SOURCE.
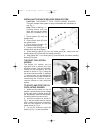
The quick release drum system is easy to assemble and convenient to
use. Fig. 1.
Note: When installing a
1
/2"
sanding sleeve onto the
shaft, do not use the rubber
drum (B) or washers (A) Fig.
1.
1. Place washer (A) onto the
spindle shaft.
2. Place rubber drum (B) onto
the spindle shaft.
3. Place second washer (A)
over the bolt hole opening.
4. Thread
5
/16-24" locking bolt (C)
onto the shaft, but do not tighten.
5. Slide sanding sleeve (D) over the rubber drum (B); (make sure the
sanding sleeve (D) is flush with the rubber drum (B).)
6. Now tighten the
5
/16-24" locking bolt (C) onto the shaft, to hold the sanding
sleeve (D) in place.
THE DUST COLLECTION
NOZZLE
The Model 121 sander can be
operated with or without the dust
collection nozzle. The dust collection
nozzle can be attached to the 121
sander as shown in Fig. 2 using the
two knob screws provided. A standard
1" vacuum hose can be attached to
the dust nozzle to provide a means for
connecting the machine to your
vacuum cleaner or dust collection
system.
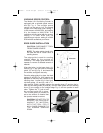
TO START AND STOP THE 121
OSCILLATING SANDER
1. Make sure the switch is in the off
position, and the power circuit voltage
is the same as the voltage shown on
the specification plate on the sander.
Connect machine to power circuit.
2. Hold the machine as shown in
Fig. 3, with the sander base in contact
with a stable and secure workpiece,
and turn the machine on with the
power switch (A) Fig. 4.
3. To turn off machine, move the
switch (A) Fig. 4, to the off position.
7
Fig. 1
Fig. 2
A
B
Fig. 3
A
C
D
899604 - 03-08-02.qxd 3/18/02 9:12 AM Page 7