


Avoid contact with the blade teeth to prevent personal
injury.
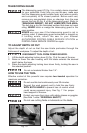
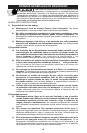
5. While holding the arbor lock (B) Fig. 7, use the provided wrench to
loosen the blade retaining bolt (A) Fig. 9.
6. Remove the blade retaining bolt by turning it counter-clockwise,
release the arbor lock, and remove the outer blade flange (B) Fig. 9.
7. Remove the blade.
INSTALLING THE BLADE
1. Remove any accumulated debris in the guards and around the arbor.
Check the telescoping guard to ensure that it is in working order.
2. Clean the inner blade flange and place the new blade on the arbor,
making sure that the teeth point up as in (D) Fig. 9. NOTE: Use blades
that have a 20mm arbor, and that are rated for 4200 rpm or higher.
Avoid contact with blade teeth to prevent personal injury.
3. Place the outer blade flange (B) Fig. 9 on the arbor with the flange
toward the blade and with the flats matching those on the arbor.
4. Replace and finger-tighten the blade retaining bolt (A) Fig. 9 by turning it
clockwise.
5. Push in the arbor lock (A) Fig. 7, and rotate the arbor by hand until the
lock engages the arbor. Tighten the blade retaining bolt securely with
the provided wrench and release the arbor lock (A) Fig. 7.
6. Install the debris collector.
7. Install the debris collector cover.
12
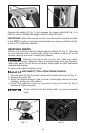
Fig. 7
Fig. 8
Fig. 9
A
A
A
B
A
C
B
D
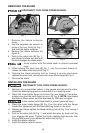
REMOVING THE BLADE
DISCONNECT TOOL FROM POWER SOURCE.
1. Remove the debris collector
cover.
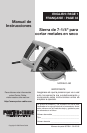
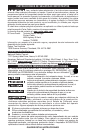
2. Use the supplied hex wrench to
remove the two bolts (A) Fig. 7
that hold the debris collector.
3. Remove the debris collector (A)
Figure 8.
4. Push in the arbor lock (B) Fig. 7,
and rotate the blade by hand until
the lock engages the blade arbor.
DISCONNECT TOOL FROM POWER SOURCE.