


22
Method 2 uses a scrap board and calipers.
1. Turn on the digital display. It turns on in
absolute mode.
2. Plane one side of a scrap board at an
appropriate and safe cutting depth (1/16” for
example).
3. Raise the table by the same amount (1/16”),
then turn the board over and plane the other
side. Do not move the table from the current
position.
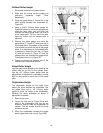
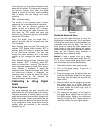
4. Measure the planed board carefully with
calipers. (Our example in Fig. 42 shows the
calipers reading .850”). This measurement
of the finished board is the equivalent of the
distance from table to knife.
5. Input the measurement on the calipers into
the digital display. Refer to the instructions
above involving the SET button function to
input this number into your digital display.
(Figure 42 shows the .850” measurement
now set in the digital display.)
Figure 42
Using Relative Measurement Mode
The absolute setting, for which you should have
already established the zero point, gives the
width of your finished board after cutting
(distance from table to cutterhead).
The relative measurement mode is useful for
measuring only the amount of stock that you
wish to remove (i.e., depth of cut), and
eliminates having to add or subtract to find the
proper setting. It is especially helpful when
planing many boards to the same thickness.
Here is an example using relative measurement:
1. You have planed a board at a setting of one
inch at absolute measurement. Do not move
the table from this position. You wish to
increase the depth of cut on the next run by
.063 inches.
2. Press ABS button to start relative
measurement mode (“INC” will appear on
the display).
3. Follow the previous instructions on using the
SET button function. You would input zeros
for all digits, thus establishing zero setting
for relative measurement mode.
4. After setting relative zero, bring the table up
until the digital display reads “.065” inches in
relative measurement mode. You can now
plane your board with exact results. Of
course, you can now toggle back and forth
between relative and absolute mode (by
pressing ABS button) and get both stock
thickness and depth of cut readings at the
same time.
Clearing a Jammed Board
If you have to temporarily move the planer table
(for example, to clear a jammed board) use the
HOLD button to remember your original setting.
1. If a board jams, press the HOLD button.
Your setting will be “frozen” on the display.
2. Lower the table and clear the jam.
3. Raise the table back up to the general
location, and make a mental note of the
number “frozen” on the display.
4. Press HOLD to return the display back to
absolute measurement, and adjust the table
until it matches the measurement previously
frozen on the display.
NOTE: The HOLD button will not permanently
save a setting. When the button is pressed a
second time, the number disappears.
More Uses
The digital scale has been designed to save the
operator time and energy, leading to increased
productivity. As you become proficient with the
use of the digital readout and explore how to use
one function in conjunction with another, you’ll
be able to tailor its functions to suit your own
work habits and planing needs.