


9
Receiving the Jointer
Carefully unpack the jointer and all loose items
from the wood crate and inspect for damage. Any
damage should be reported to your distributor and
shipping agent immediately. Before proceeding
further, read your manual thoroughly to familiarize
yourself with proper assembly, set-up,
maintenance, safety and operating procedures.
Exposed metal parts such as the table and fence
have been given a protective coating at the factory.
This should be removed with a soft cloth moistened
with a solvent (such as kerosene). Do not use
acetone, gasoline or lacquer thinner for this
purpose. Do not use an abrasive pad. After
cleaning, it is recommended that you cover all
unpainted surfaces with a good quality paste wax.
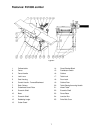
Crate contents:
1 jointer
1 dust chute
1 fence assembly
4 hex wrenches (3, 5, 8 and 10mm)
3 open-end wrenches (10-12mm, 12-14mm,
17-19mm)
2 push pads
1 helical cutter head tool package:
2 rabbet knives
8 two-sided standard knives
7 gibs
7 gib nuts
7 gib screws
1 hex wrench 5mm (L type)
3 hex wrenches 5mm (T type)
1 manual
1 warranty card
Installation and Assembly
Tools required
10mm hex wrench (provided)
Phillips screwdriver
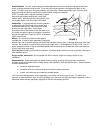
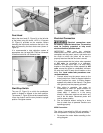
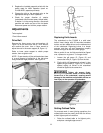
The supplied tools are shipped inside the bottom of
the stand, and can be removed through the dust
outlet (A, Figure 5) on the left side of the machine.
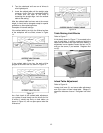
Remove the bolts holding the jointer to the skid,
and lift the machine from the skid using a hoist.
The strap should be suitable to lift 1320 pounds of
weight, and should be placed under the base
casting as shown in Figure 6. DO NOT place strap
under the tables.
Figure 5
Figure 6
The jointer should be mounted to a solid, level
foundation, preferably a concrete floor. The
machine area should be clean, dry, well ventilated
and well lighted, with sufficient space around the
machine for operation and maintenance work.
This machine is equipped with noise-reducing table
lips. The work site should, however, be one which
minimizes reverberant sound from walls, ceilings
and other equipment.
Fence Installation
Mount the fence (A, Figure 7) to the holes on the
jointer table with the two socket head cap screws
(B, Figure 7), using a 10mm hex wrench. Tighten
the screws (B, Figure 7) securely.