


12
Electrical Connections
Electrical connections must
be made by a qualified electrician in
compliance with all relevant codes. This
machine must be properly grounded to help
prevent electrical shock and possible fatal
injury.
The PM1900TX is equipped with either a single
phase, 230 volt only motor; or a three phase,
230/460V motor (pre-wired 230V). Keep in mind
that a circuit being used by other machines
(tools, lights, heaters, etc.) at the same time will
add to the electrical load. Thus, it is
recommended that the single phase machine
be connected to a dedicated 40 amp circuit, with
a 40 amp circuit breaker or fuse. It is
recommended that the three phase machine
be connected to a dedicated 20 amp circuit with
a 20 amp circuit breaker or fuse. Local codes
take precedence over recommendations.
The three phase dust collector can be re-wired
for 460V operation as follows:
To convert from 230 to 460 volt operation:
1. Disconnect from power source; unplug!
2. Connect the motor leads as shown in the
diagram inside the motor junction box; this
diagram is also shown on page 20 of this
manual.
3. Replace the plug on the power cord with an
appropriate UL/CSA listed 460V plug.
4. When finished wiring, re-install junction box
cover.
Grounding Instructions
This machine must be grounded. In the event of
a malfunction or breakdown, grounding provides
a path of least resistance for electric current to
reduce the risk of electric shock.
Improper connection of the equipment-
grounding conductor can result in a risk of
electric shock. The conductor with insulation
having an outer surface that is green with or
without yellow stripes, is the equipment-
grounding conductor. If repair or replacement of
the electric cord or plug is necessary, do not
connect the equipment-grounding conductor to a
live terminal.
The hose or ductwork you use to connect the
tool to the dust collector must also be grounded.
Make sure the voltage of your power supply
matches the specifications on the motor plate of
the dust collector.
Check with a qualified electrician or service
personnel if the grounding instructions are not
completely understood, or if in doubt as to
whether the tool is properly grounded.
Repair or replace a damaged or worn cord
immediately.
Extension Cords
If an extension cord is needed, make sure the
cord rating is suitable for the amperage listed on
the machine’s motor plate. An undersize cord
will cause a drop in line voltage resulting in loss
of power and overheating.
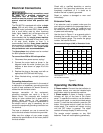
Use the chart in Figure 11 as a general guide in
choosing the correct size cord. If in doubt, use
the next heavier gauge. The smaller the gauge
number, the heavier the cord.
Recommended Gauges (AWG) of Extension Cords
Amps
Extension Cord Length *
25
feet
50
feet
75
feet
100
feet
150
feet
200
feet
< 5 16 16 16 14 12 12
5 to 8 16 16 14 12 10 NR
8 to 12 14 14 12 10 NR NR
12 to 15 12 12 10 10 NR NR
15 to 20 10 10 10 NR NR NR
21 to 30 10 NR NR NR NR NR
*based on limiting the line voltage drop to 5V at 150% of the
rated amperes.
NR: Not Recommended.
Figure 11
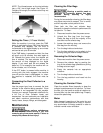
Operating the Machine
3 Phase models: Connect the dust collector to
the power source, and use the industrial-style
push-button switch to operate the machine.
1 Phase models: If power is flowing, a green
indicator will light on the face of the control
panel. To operate the machine, use the buttons
on the control panel, or use the provided remote
control. To start the dust collector, press the ON
button. If the remote control is used, aim it at the
control panel. The machine will remain running
until the OFF button is pressed. The digital
readout will always display 00 while running.
The remote control operates on two AAA
batteries. These will need replacing periodically.