


8
Installation and Assembly
Tools required for assembly:
7/16, 9/16, 3/8 and 1/2” wrenches
1/8 and 3/32” hex wrenches
Flat head screwdriver
Hammer and wood block (or rubber hammer)
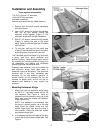
1. Remove box and wood crating completely
from around saw.
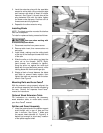
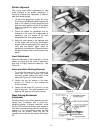
2. Use a 9/16” wrench to remove the carriage
bolt, hex nut and washer holding the
extension wings together (Figure 1). Set
extension wings aside for later installation.
3. With a 7/16” wrench, remove the lag screws
(Figure 2) holding the saw to the wood
pallet. Carefully slide the saw from the pallet
onto the floor.
4. Tilt the saw, and pop off the metal tabs
(Figure 2) that secured the saw to the pallet,
by pushing down on them with your foot.
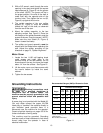
The Table Saw should be placed in an area with
a sturdy level floor, good ventilation and
sufficient lighting. Leave enough space around
the machine for mounting extension wings and
rail assemblies, and loading and off-loading
stock and general maintenance work.
Exposed metal surfaces, such as the table top
and extension wings, have been given a
protective coating at the factory. This should be
removed with a soft cloth moistened with
kerosene. Do not use acetone, gasoline, or
lacquer thinner for this purpose. Do not use
solvents on plastic parts, and do not use an
abrasive pad because it may scratch the
surfaces.
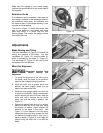
Mounting Extension Wings
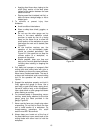
1. Mount the cast iron extension wings using
six 3/8-16 x 1 hex head screws and six 3/8
lock washers. See Figure 3. Have an
assistant hold the extension wing up to the
table, and insert the screws and washers.
Finger tighten only.
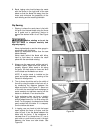
NOTE: If an assistant is not available, hold
the wing in vertical position up to the saw
table, insert the middle screw and lock
washer finger tight, then pivot the wing to
level position. Insert the other two screws
and washers finger tight.
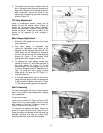
2. It is important that the front edge of the wing
is flush with the front edge of saw table. See
Figure 4.
Figure 1
Figure 2
Figure 3
Figure 4