


Ridge Tool Company
5
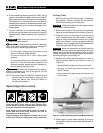
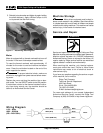
screw provided (Figure 2). Use Allen wrench to tight-
en screw onto the flat on the shaft.
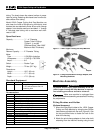
Mounting on No. 1206 Stand
1. Set up the 1206 Stand by opening legs and pushing
down on the tray. Legs should be stiff and the stand
should not wobble.
NOTE! The tristand leg stiffness can be increased or
decreased by the following procedure:
Place stand upside down on a flat surface.
Unlock tray so legs are loose.
Locate the set screw on the tray leg support on
the rear leg.
Loosen the set screw to make the adjustment.
To increase stiffness, move the tray leg support
up towards the base. To decrease stiffness,
move the tray leg down towards the feet.
Tighten the set screw (increasing leg stiffness
increases tray tension).
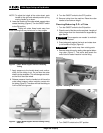
2. Mount machine on the stand using three (3)
3
/
8
″ -
16 x 1
3
/
4
″ bolts and washers (Figure 3).
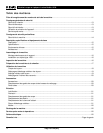
Machine Inspection
WARNING
To prevent serious injury, inspect your machine.
The following inspection procedures should be
performed before each use:
1. Make sure the machine is unplugged and the
ON/OFF switch is set to the OFF position.
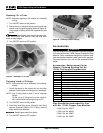
2. Inspect the cutting edges of the cutter wheel and
reamer blade for wear and/or damage. Inspect the
brush for wear. Replace if necessary.
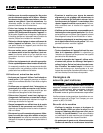
3. Inspect the power cord and plug for damage. If the
plug has been modified, is missing the grounding
prong or if the cord is damaged, do not use the
machine until the cord has been replaced.
4. Clean dirt and debris from the rollers. Rollers must be
kept clean to insure proper machine performance.
5. Inspect machine for any broken, missing, misaligned
or binding parts as well as any other conditions which
may affect the safe and normal operation of the
machine. If any of these conditions are present, do not
use the machine until any problem has been repaired.
6. Lubricate the machine if necessary according to the
Maintenance Instructions.
7. Use cutter wheels and accessories that are designed
for your machine and meet the needs of your appli-
cation. The correct parts and accessories allow you to
do the job successfully and safely. Accessories
designed for use with other equipment may be haz-
ardous when used with this copper prep machine.
8. Clean any oil, grease or dirt from all handles and
controls. This reduces the risk of injury due to a tool
or control slipping from your grip.
9. Make sure the guard covering the reamer and exter-
nal wire brush is not damaged.
Machine and Work Area Set-Up
WARNING
To prevent serious injury, proper set-up of the
machine and work area is required. The following
procedures should be followed to set-up the machine:
1. Check that the work area has the following:
• Adequate lighting.
• No flammable liquids, vapors or dust that may ignite.
• Grounded electrical outlet.
• Clear path to the electrical outlet that does not
contain any sources of heat or oil, sharp edges or
moving parts that may damage electrical cord.
• Dry place for machine and operator. Do not use
the machine while standing in water.
2. Clean up the work area prior to setting up any equip-
ment. Move tools and debris to prevent slips and
falls.
3. Make sure motor ON/OFF switch is in the OFF posi-
tion.
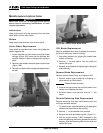
4. If not mounted to a 1206 Stand, place machine on a
flat, level bench.
Failure to place the machine on a stable
stand or bench may result in tipping and serious injury.
5. If workpiece extends more than four (4) feet beyond
the machine, use one or more pipe stands to prevent
the tube falling.
122XL Copper Cutting and Prep Machine
WARNING