


14
15
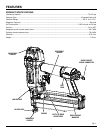
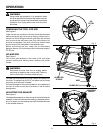
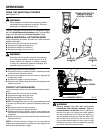
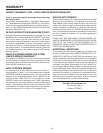
SELECTOR
IN POSITION
B
SELECTOR
IN POSITION
A
TRIGGER LEVER PIVOT PIN
(DEPRESS TO ALLOW
SELECTOR TO ROTATE)
OPERATION
Fig. 8
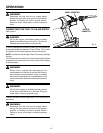
Fig. 9
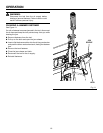
TRIGGER
WORKPIECE CONTACT
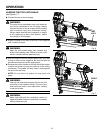
WARNING:
During normal use the tool will recoil
immediately after driving a fastener. This is a
normal function of the tool. Do not attempt to
prevent the recoil by holding the nailer against
the work. Restriction to the recoil can result in a
second fastener being driven from the nailer. Grip
the handle firmly, let the tool do the work, and
do not place second hand on top of tool or near
exhaust at any time. Failure to heed this warning
can result in serious personal injury.
USING THE SELECTABLE TRIGGER
See Figures 8 - 9.
WARNING:
Never wedge or hold back the workpiece contact
mechanism during operation of the tool. Doing so
could result in possible serious injury.
This tool is shipped from the factory with a selectable trigger
set in the Single Sequential Actuation mode. The selectable
trigger can also be set for Contact Actuation mode.
SINGLE SEQUENTIAL ACTUATION MODE
Single sequential actuation provides the most accurate
fastener placement.
n Disconnect the tool from the air supply.
n Depress the trigger lever pivot pin.
n Rotate the selector to Position A.
n Release the trigger lever pivot pin.
WARNING:
The nailer will not function properly if the selector
is not securely seated in either position A or B.
Always assure the selector is seated properly
to avoid an unexpected fastener discharge and
possible serious personal injury.
n Reconnect the tool to the air supply.
n Grip the tool firmly to maintain control. Position the nose
of the tool onto the work surface.
n Push the tool against the work surface to depress the
workpiece contact.
n Squeeze the trigger to drive a fastener.
n Allow the tool to recoil away from the work surface as the
fastener is driven.
CONTACT ACTUATION MODE
Contact actuation allows very fast repetitive fastener place-
ment.
n Disconnect the tool from the air supply.
n Depress the trigger lever pivot pin.
n Rotate the selector to Position B.
n Release the trigger lever pivot pin.
NOTE: The trigger lever pivot pin is spring loaded and held
in position by locking tab to prevent movement during op-
eration.
n Reconnect the tool to the air supply.
n Grip the tool firmly to maintain control.
n Squeeze and hold the trigger. Push the tool against the
work surface to depress the workpiece contact and drive
a fastener.
n Allow the tool to recoil away from the work surface as the
fastener is driven.
NOTE: In Contact Actuation Mode, the tool may also be
operated by depressing the workpiece contact against the
surface and squeezing the trigger.