


10
WARNING:
If any parts are missing do not operate the tool until
the missing parts are replaced. Failure to do so
could result in possible serious personal injury.
WARNING:
Do not connect to power supply until assembly
is complete. Failure to comply could result in
accidental starting and possible serious personal
injury.
WARNING:
Do not attempt to modify this tool or create
accessories not recommended for use with this
tool. Any such alteration or modification is misuse
and could result in a hazardous condition leading
to possible serious personal injury.
ASSEMBLY
UNPACKING
This product has been shipped completely assembled.
n Carefully remove the tool and any accessories from the
box. Make sure that all items listed in the packing list are
included.
n Inspect the tool carefully to make sure no breakage or
damage occurred during shipping.
n Do not discard the packing material until you have care-
fully inspected and satisfactorily operated the tool.
n If any parts are damaged or missing, please call
1-866-539-1710 for assistance.
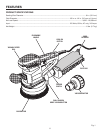
PACKING LIST
Random Orbit Sander
Sanding Disc, 80-grit (3)
Cloth Dust Bag (1)
Dust Bag Support (1)
Vacuum Adaptor
Hex Key
Operator’s Manual
Warranty Registration Card
APPLICATIONS
You may use this tool for the purposes listed below:
n Sanding wood or wood product surfaces.
n Sanding steel surfaces.
n Removing rust from steel surfaces.
OPERATION
WARNING:
Do not allow familiarity with tools to make you
careless. Remember that a careless fraction of a
second is sufficient to inflict severe injury.
WARNING:
Always wear safety goggles or safety glasses with
side shields when operating tools. Failure to do
so could result in objects being thrown into your
eyes resulting in possible serious injury.
WARNING:
Do not use any attachments or accessories
not recommended by the manufacturer of this
tool. The use of attachments or accessories not
recommended can result in serious personal
injury.
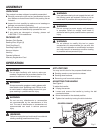
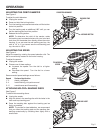
ADJUSTING THE HANDLE
See Figure 2.
To adjust the handle:
n Unplug the sander.
n Loosen and remove the handle by turning the dial
counterclockwise.
n Move the handle to the desired position.
n Tighten the handle by turning the dial clockwise.
Fig. 2
COUNTERCLOCKWISE
CLOCKWISE
WARNING:
Failure to unplug the tool could result in accidental
starting causing possible serious injury.