


10
ASSEMBLY
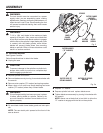
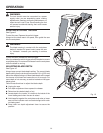
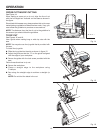
Fig. 2
SPINDLE
BLADE
SCREW
OUTER FLANGE
WASHER
(“D” WASHER)
BLADE
INNER
FLANGE
BUSHING
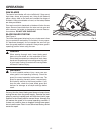
WARNING:
The tool should never be connected to a power
supply when you are assembling parts, making
adjustments, cleaning, performing maintenance, or
when the tool is not in use. Disconnecting the tool
will prevent accidental starting that could cause
serious injury.
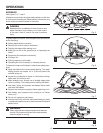
WARNING:
7-1/4 in. (184 mm) blade is the maximum blade
capacity of the saw. Also, never use a blade that
is too thick to allow outer blade washer to engage
with the flat on the spindle. Larger blades will come
in contact with the blade guards, while thicker
blades will prevent blade screw from securing
blade on spindle. Either of these situations could
result in a serious accident.
ATTACHING BLADE
See Figures 2 and 2a.
Follow these directions to attach the blade.
n Unplug the saw.
CAUTION:
To prevent damage to the spindle or spindle lock,
always allow motor to come to a complete stop
before engaging spindle lock.
n Depress spindle lock button.
n Remove blade screw by turning it counterclockwise with
the wrench.
n Remove outer washer ("D" washer) and spring washer.
n Wipe a drop of oil onto inner flange bushing and outer
washer ("D" washer) where they contact blade.
WARNING:
If inner flange bushing has been removed, replace
it before placing blade on spindle. Failure to do
so could cause an accident since blade will not
tighten properly.
n Fit saw blade inside lower blade guard and onto spin-
dle.
NOTE: The saw teeth point upward at the front of the
saw as shown.
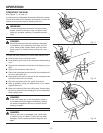
n Replace "D" washer.
n Depress spindle lock and replace blade screw.
n Tighten blade screw securely by turning it clockwise with
the wrench.
NOTE: Never use a blade that is too thick to allow the
"D" washer to engage with the flat on the spindle.
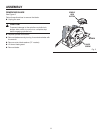
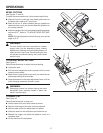
SPRING
WASHER
OUTER WASHER
(“D” WASHER)
CUPPED SIDE OF
SPRING WASHER
OUTSIDE OF SPRING
WASHER
Fig. 2a