


12
OPERATION
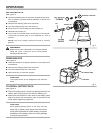
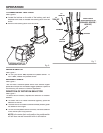
INSTALLING BITS
See Figure 4.
n
Lock the paddle switch on the driver by placing the direc-
tion of rotation (forward-reverse) selector in center lock
out position.
n
Remove the battery pack from the driver.
n
Pull the coupler away from the driver (1).
n
Insert driver bit to be used into the coupler (2).
n
Release the coupler (3).
n
Pull on the bit to make sure it is secured in the coupler.
There may be some play in the installed bit, this is
normal.
NOTE:
Use only impact quality bits with a locking
groove.
WARNING:
Make sure the bit is secured in the coupler before
using the driver. Failure to do so could cause
serious personal injury.
REMOVING BITS
See Figure 4.
n
Place the direction of rotation selector in the center lock
out position.
n
Remove the battery pack from the driver.
n
Pull the coupler away from the driver.
n
Remove driver bit from the coupler.
CAUTION:
The impact driver is not designed to be used as
a drill.
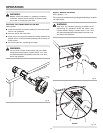
TO INSTALL BATTERY PACK
See Figure 5.
n
Place the battery pack in the driver aligning raised rib on
battery pack with groove in the driver's battery port.
n
Make sure the latches on each side of the battery pack
snap into place and the battery pack is secured to the
driver before beginning operation.
CAUTION:
When placing battery pack in the tool, be sure
raised rib on battery pack aligns with the bottom
of the drill and latches into place prop er ly. Im prop er
installation of the battery pack can cause dam age
to in ter nal components.
LOCKING
GROOVE
Fig. 4
1
2
3
PULL COUPLER
FORWARD
INSERT BIT
RELEASE COUPLER
COUPLER
RAISED RIBS
LATCHES
Fig. 5
BIT