


15
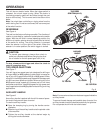
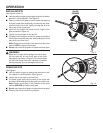
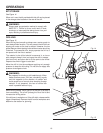
INSTALLING DEPTH GAUGE ROD
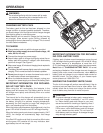
See Figures 11 and 12.
A depth gauge rod has been packed with your hammer drill to
assist you in controlling the depth of drilled holes.
When drilling holes with the depth gauge rod installed, the
desired hole depth has been reached when the end of the
rod comes in contact with the surface of the material being
drilled.
Follow these steps to install and adjust the depth gauge rod.
1. Loosen the auxiliary handle.
2. Insert the depth gauge rod through hole on the auxiliary
handle.
3. Adjust the depth gauge rod so that the drill bit extends
beyond the end of the rod to the required drilling
depth.
4. Tighten the auxiliary handle securely. This secures the
depth gauge rod at the desired depth of cut. It also
secures the auxiliary handle.
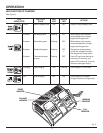
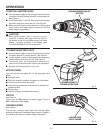
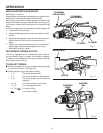
ADJUSTABLE TORQUE CLUTCH
This drill is equipped with an adjustable torque clutch for
driving different types of screws into different materials.
The proper setting depends on the type of material and the
size of screw you are using.
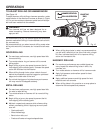
TO ADJUST TORQUE
■ Identify the twenty four torque indicator settings located
on the front of the drill. See Figure 13.
■ Rotate adjusting ring to the desired setting.
• 1 - 4 For driving small screws.
• 5 -8 For driving screws into soft material.
• 9 -12 For driving screws into soft and hard
materials.
• 13 -16 For driving screws in hard wood.
• 17 - 20 For driving large screws.
• 21 - 23 ( ) For heavy drilling.
• For hammer drilling.
OPERATION
Fig. 13
TO DECREASE
TORQUE
TO INCREASE
TORQUE
ADJUSTING
RING
TO INCREASE
DRILLING DEPTH
Fig. 11
TO DECREASE
DRILLING DEPTH
TO TIGHTEN
TO LOOSEN
DRILL BIT
Fig. 12
DRILLING DEPTH