


16
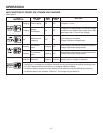
SPLINTER-FREE CUTTING
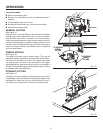
See Figure 9.
The anti-splintering insert is especially useful when cutting
plywood. It should only be used when making straight cuts
or circle cuts. It is not for bevel cutting or plunge cutting.
NOTE: The non-orbital setting also helps reduce splintering
when cutting plywood.
To attach and remove the anti-splintering insert:
Remove the battery pack.
Set the cutting angle at 0°.
To attach, slide the insert back onto the tabs on the front
of the shoe. Make sure it snaps securely into place.
To remove, grasp the anti-splintering insert and pull
straight out.
Reinstall the battery pack.
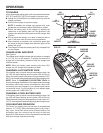
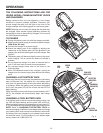
CHIP SHIELD
See Figure 10.
A clear plastic chip shield on the front of the saw helps
protect against flying dust and chips.
To remove and reattach the chip shield:
Remove the battery pack.
To remove, grasp and push in the sides of the chip shield
as shown. Pull out.
To reattach, grasp and push in the sides of the chip shield
as shown. Slide it into the slots on each side of the front
of the saw.
Reinstall the battery pack.
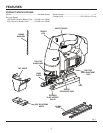
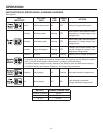
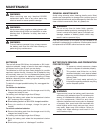
INSTALLING/REMOVING BLADES
See Figure 11.
NOTE: The jig saw is designed to use T-shank blades
only.
To install blades:
Remove the battery pack.
Remove the chip shield and the anti-splintering insert if
needed.
Lift the blade clamp until it stops.
� Holding the blade clamp up, insert the saw blade as far
as possible into the slot in the saw bar. Some resistance
may be felt in doing this.
� Check to make sure the back of the saw blade is centered
in the groove of the blade-support roller.
� Release the blade clamp. Make sure the blade is securely
in place.
Replace the chip shield and anti-splintering insert if
needed.
Reinstall the battery pack.
Fig. 11
BLADE
CLAMP
OPERATION
SAW BLADE
ANTI-SPLINTERING
INSERT
TO
LOCK
TO
RELEASE
GROOVE
Fig.10
Fig. 9
SAW BAR
TO
INSTALL
TO
REMOVE
TO
REMOVE
CHIP
SHIELD
BLADE-SUPPORT
ROLLER