


6
n Check all clearances for free blade rotation.
n Reconnect power to the saw
n Turn the saw “ON”.
n Slowly and cautiously raise the dado blade into the zero
clearance insert.
WARNING:
Never stand directly in line with the blade or allow
hands to come closer than 3 in. to the blade. Do not
reach over or across the blade. Failure to heed this
warning can result in serious personal injury.
n Turn the saw “OFF” and unplug.
n The blade guard assembly is not used for “non-through”
cuts.
n The table saw and zero clearance insert are now ready to
use. When replacing the saw blade insert, always replace
the blade guard assembly.
WARNING:
The zero clearance insert must be even with the
table surface. Inserts too high or too low can cause
the workpiece to “snag” or catch on uneven edges.
Workpieces could twist and kickback and could
result in injury.
USE
OPERATION TIPS
n Do not use the zero clearance insert for molding
operations. Use the 10 in. Dado/Molding Insert
(AC1040).
n The zero clearance insert supports the workpieces
right next to the blade to help prevent chipping and
splintering. It also prevents small pieces from becoming
wedged between the blade and the large opening in a
conventional metal table insert.
n For best results with any through cut, always adjust the
blade depth to ensure the cut is 1/8 in.-1/4 in. higher
than the workpiece.
n A separate zero clearance insert is recommended for
each blade, dado blade, or different set-up.
WHEN MAKING BEVEL CUTS
n Install the zero clearance insert with the blade at 90°.
See Installing “Removing The Existing Throat Plate
And Installing Zero Clearance Insert For Through Cuts”
section of this manual.
n Bevel the blade to the required setting.
n Slowly and cautiously raise the saw blade into the zero
clearance insert.
n If using blade stabilizers, check for proper clearance
before raising the saw blade.
n When using a dado set follow the procedures above.
However, use additional caution due to the large amount
of material being “cut-away” from the zero clearance
insert.
n Check all clearances for free blade rotation.
n Never operate the saw without the proper insert
installed.
n When replacing the saw blade and saw blade insert,
always replace the blade guard for all through cuts.
n If burrs are present, remove them before continuing.
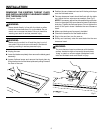
INSTALLATION
INSTALLING ZERO CLEARANCE INSERT/
DADO SETS
See Figure 2.
WARNING:
Make sure the switch is off and the plug is out of
the outlet. Failure to do so could result in accidental
starting, resulting in serious personal injury.
NOTE: Before using the dado set read and understand the
Safety and Operating instructions contained in the Operator’s
Manual furnished with your table saw and the instructions
furnished with your dado blade set.
n Unplug the saw.
n Lower the dado blade completely.
n Position the zero clearance insert until the key slot drops
over the flat head screw.
n The zero clearance insert should be flush with the table
top.
Adjust the four set screws as needed.
NOTE: If necessary, adjust the side positioning set screw
found on the edge of the zero clearance insert to eliminate
side play. Tighten the flat head screw. Do not tighten the
screw to the point where it deflects the zero clearance
insert.