


16 17
BIT
HOLDER
STORAGE
OPERATION
Fig. 12
Fig. 11
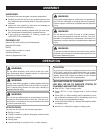
MAGNETIC BIT
HOLDER
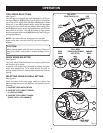
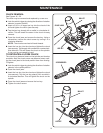
UNLOCK
(RELEASE)
LOCK
(TIGHTEN)
CHUCK BODY
CHUCK
JAWS
BIT
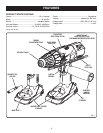
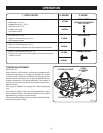
BIT STORAGE
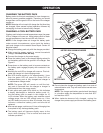
See Figure 11.
When not in use, bits provided with the drill can be placed
in the storage areas located on the base of the drill.
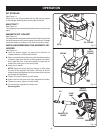
MAG TRAY™
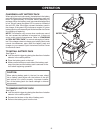
See Figure 12.
The magnetic tray conveniently stores screws or other small
parts.
MAGNETIC BIT HOLDER
See Figure 12.
The magnetic bit holder extends the reach of the bit and holds
the bit and screws until you are ready to drive them. Storage
for the bit holder is located on the front of the tool’s base.
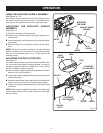
INSTALLING/REMOVING THE MAGNETIC BIT
HOLDER
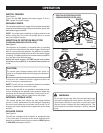
See Figure 13.
n Lock the switch trigger by placing the direction of
rotation selector in the center position.
n Open or close the chuck jaws to a point where the opening
is slightly larger than the end of the magnetic bit holder.
Also, raise the front of the drill slightly to keep the bit
holder from falling out of the chuck jaws.
n Insert the bit holder.
NOTE: Open the chuck jaws just enough to fully insert
the end of the magnetic bit holder. The body of the bit
holder should rest against the chuck jaws when the jaws
are closed and tightened.
n Tighten the chuck jaws on the bit holder.
n Insert a bit into the open end of the magnetic bit holder.
n Tighten the chuck jaws on the bit holder.
n To remove the magnetic bit holder, see
Removing Bits.
MAG
TRAY
SCREWS
BIT STORAGE
BIT(S)
Fig. 13