


Page 8
ASSEMBLY
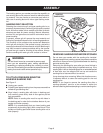
The backing pad on your sander provides the capability to
use sanding discs with pressure sensitive adhesive back-
ing material. You also receive a conversion pad which al-
lows use of sanding discs with velcro type backing mate-
rial.
SANDING DISC SELECTION
Selecting the correct size grit and type sanding disc is an
extremely important step in achieving a high quality sanded
finish. Aluminum oxide, silicon carbide, and other synthetic
abrasives are best for power sanding. Natural abrasives,
such as flint and garnet are too soft for economical use in
power sanding.
In general, coarse grit will remove the most material and
finer grit will produce the best finish in all sanding operations.
The condition of the surface to be sanded will determine
which grit will do the job. If the surface is rough, start with a
coarse grit and sand until the surface is uniform. Medium grit
may then be used to remove scratches left by the coarser
grit and finer grit used for finishing of the surface. Always
continue sanding with each grit until surface is uniform.
WARNING:
The tool should never be connected to power supply
when you are assembling parts, making adjustments,
assembling or replacing sanding disc, cleaning, or when
not in use. Disconnecting your sander can prevent accidental
starting that could cause serious personal injury.
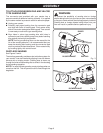
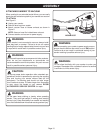
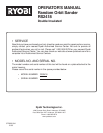
Fig. 2
ADHESIVE
SANDING DISC
BACKING
PAD
TO ATTACH PRESSURE SENSITIVE
ADHESIVE SANDING DISC
See Figure 2.
Unplug your sander.
Carefully peel paper backing from the pressure sensitive
adhesive type sanding disc.
Align holes in sanding disc with holes in backing pad,
then carefully press sticky side of disc against pad as
tight as possible.
NOTE: Holes in sanding disc must line up with holes in
the backing pad in order for the dustless feature of your
sander to function properly.
NOTE: It is recommended that you clean backing pad
occasionally by brushing lightly with a small brush. Dust
buildup on backing pad could cause sanding disc not to
stick properly.
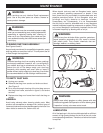
REMOVING SANDING DISC BEFORE STORAGE
Do not store your sander with the sanding disc installed.
Heat generated from sanding causes the pressure sensitive
adhesive to flow and form a tight bond between the backing
pad and sanding disc.
Removing the sanding disc soon after you have finished a
sanding operation avoids letting the adhesive set up. If the
sanding disc is left on the backing pad for an extended period
of time after use, the adhesive will set up and cause the
sanding disc to become difficult to remove.
It may also tear when removing. When this situation occurs,
it becomes difficult to clean the backing pad for the next
sanding disc.
NOTE: If you forget to remove the sanding disc after a
sanding operation, sand for a few minutes to soften the
adhesive backing before attempting to remove sanding disc.