


10
Fig. 2
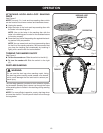
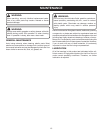
ATTACHING HOOK-AND-LOOP SANDING
DISCS
See Figure 2.
NOTE: Use only 5 in. hook-and-loop sanding discs which
can be found at local home centers and hardware stores.
Unplug the sander.
Align the holes in the hook-and-loop sanding disc with
the holes in the backing pad.
NOTE: Line up the holes in the sanding disc with the
holes in the backing pad in order for the dustless feature
to function properly.
Press the fuzzy side of the sanding disc against the back-
ing pad as firmly as possible.
NOTE: You can reuse hook-and-loop type sanding discs
for the life of the sanding abrasive. We recommend that
you clean the backing pad occasionally by brushing it
lightly with a small brush for best adhesion.
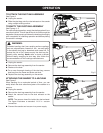
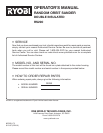
TURNING THE SANDER ON/OFF
See Figure 3.
To turn the sander on: Slide the switch to the left ( l ).
To turn the sander off: Slide the switch to the right
( O ).
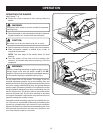
DUSTLESS SANDING
WARNING:
Do not use the dust bag when sanding metal. Using
the dust bag when sanding metal creates a fire hazard,
which could damage the tool and lead to serious per-
sonal injury.
The dust bag assembly provides a dust collection system
for the sander. Sanding dust is drawn up through the holes
of the sanding disc to collect in the dust bag during sanding
operation.
NOTE: For more efficient operation, empty dust bag when
no more than half full. This will permit the air to flow through
the bag better.
hooK-AND-LooP
SANDING DISC
BACKING PAD
OPERATION
Fig. 3
To
TURN oN
To
TURN off