


16
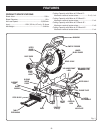
ASSEMBLY
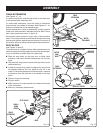
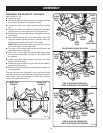
Fig. 12
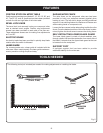
STOP BLOCK
SMALL
WING
SCREW
TABLE
EXTENSION
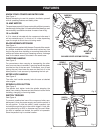
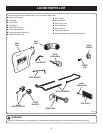
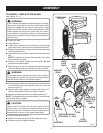
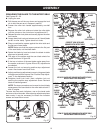
Fig. 13
Fig. 14
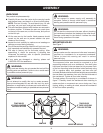
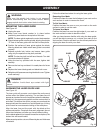
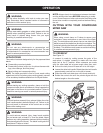
Fig. 15
CLAMP
BRACKET SCREW
SAW VIEWED FROM BOTTOM
CLAMP
BRACKET
CLAMP
BRACKET
ASSEMBLED
TABLE
EXTENSION
BRACKET
SUPPORT
MITER
SAW BASE
MITER
SAW
BASE
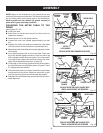
TABLE
EXTENSION
STOP
BLOCK
BASE
TABLE EXTENSIONS
See Figures 12 - 14.
To use the stop block, slide the stop block on the back arm
of the desired table extension first.
To install table extensions, insert the ends of extensions
into the holes in the sides of the base. See Figures 13 - 14.
Adjust the extensions to the desired length.
Secure extensions in place by positioning a clamp bracket
under each table extension beneath the miter table. Orient
each clamp bracket as shown in figure 14.
Secure each clamp bracket in place with a clamp bracket
screw. The clamp bracket screw threads through the clamp
bracket and tightens against bracket support on bottom of
miter table, securing clamp bracket against table extension.
STOP BLOCK
See Figures 12 and 15.
The stop block is included with the table extensions and is
useful as a stop for making repetitive cuts to the same length.
It can be installed on either side of the saw base:
n Slide the stop block on the back arm of either table
extension, then insert the table extensions into the saw
base.
n Use the small wing screw to secure the stop block to the
table extensions.
�n Loosen the small wing screw and adjust the stop block
the desired distance from the blade for the cut to be
made. For accurate placement of the stop block, measure
the distance from the teeth set on the blade to the stop
block.
�n Tighten wing screw securely.
�n Plug the saw in.
�n Make a test cut in scrap material and measure the length
of the workpiece.
�n Make any necessary adjustments.