


10
USING THE BUILT-IN BATTERY TESTER
OVERVIEW
The charger has a built-in battery tester
that displays either an accurate battery
voltage or an estimate of the battery’s
relative charge based on the battery
voltage and a scale set by the Battery
Council International.
TESTING SEQUENCE
There are four basic steps required to
use the charger as a battery tester.
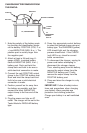
1. Connect the charger battery clamps to
the battery. Be sure to follow all of the
precautions listed under “OPERAT-
ING INSTRUCTIONS”.
2. Connect the charger power cord to a
120 VAC outlet. Again, be sure to follow
all of the precautions listed under “OP-
ERATING INSTRUCTIONS”.
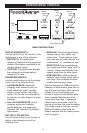
3. If necessary, press the Battery Type
button until the correct type is indi-
cated.
4. Read the voltage on the digital meter or
press the display mode button to set
the tester to “Battery %” and read the
battery percent.
TESTER AND CHARGER
When first turned on, the charger
operates only as a tester, not as a
charger. To continue to use it as only a
tester, avoid pressing the CHARGE
RATE switch button. Selecting a charge
rate activates the battery charger and
deactivates the tester.
POWER-UP IDLE TIME LIMIT
If no switch button is pressed within ten
minutes after the unit is first powered
up, the unit will automatically switch
from tester to charger, if a battery is
connected. In that case, the unit will be
set for the 2A charge rate and REGU-
LAR battery type.
TESTER WITHOUT TIME LIMIT
If either the DISPLAY MODE or BAT-
TERY TYPE button is pressed within the
first ten minutes after the unit is
powered up, the unit will remain a tester
(not a charger) indefinitely, unless a
charge rate is selected.
TESTING AFTER CHARGING
After the unit has been changed from
tester to charger (by selecting a charge
rate), it remains a charger as long as it
has power. Disconnect and reconnect
the power to change the unit back to a
tester.
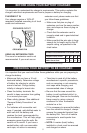
TESTER STATUS LEDs
When the charger is operating as a
battery tester, the status LEDs light
under the following conditions.
• The CHARGED (green) LED will light
if a fully charged battery is tested.
• The CHARGING (yellow) LED does
not light in the battery test mode.
• The CHECK (red) LED will light if a
battery is not properly connected.
• When the tester display mode is set
to voltage, none of the Status LEDs
light (it could be testing a battery) as
long as a voltage greater than one
volt is detected.
INITIAL PERCENT CALCULATION
When a battery % is calculated for the
first time after connecting a battery, the
digital meter will show two dashes (“--”)
for several seconds while the tester
analyzes the battery.
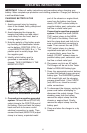
NOTES FOR TESTING BATTERY %
A recently charged battery could have a
temporarily high voltage due to what is
known as “surface charge”. The voltage
of such a battery will gradually drop
during the period immediately after the
charging system is disengaged.
Consequently, the tester could display
inconsistent values for such a battery.
For a more accurate reading, the
surface charge should be removed by
temporarily creating a load on the
battery, such as by turning on lights or
other accessories.
The battery % ranges from 0 to 100.
The battery tester is only designed to
test 12V batteries. Testing a device with
a rapidly changing voltage could yield
unexpected or inaccurate results.