


9
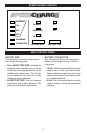
USING YOUR BATTERY CHARGER
OVERVIEW
Using the battery charger is very simple.
First, connect the battery and AC power
following the precautions listed under
“OPERATING INSTRUCTIONS”. Then
select the appropriate BATTERY TYPE
and BATTERY SIZE for your battery. The
charger will then do everything automati-
cally. This section explains a few details.
GENERAL CHARGING NOTES: If the
charger does not detect a properly con-
nected battery, the CONNECTED LED
will not light until a battery is detected.
Charging will not begin until the CON-
NECTED LED on. When charging
begins, the CHARGING LED will be lit.
If the charge mode is changed after
charging has started (by pressing the
BATTERY SIZE or BATTERY TYPE
button), the charging process will be
restarted.
Your charger is equipped with a relay.
This device turns the charge current
on and off to the battery. It is normal to
occasionally hear a clicking sound when
the relay is turned on or off.
AUTOMATIC SHUT OFF: When the
2A, 4A or 6A charge rate is selected, the
charger is set to perform an automatic
charge. When an automatic charge is
performed, the charger stops charg-
ing automatically after the battery is
charged.
ABORTED CHARGE: If charging cannot
be completed normally, charging will be
aborted. When charging is aborted, the
charger’s output is shut off and all the
LEDs are off except the CONNECTED
LED. In this state, the charger ignores
all buttons. To reset the charger after an
aborted charge, unplug the charger.
COMPLETION OF CHARGING:
Charge completion is indicated by the
CHARGED (green) LED; when lit, the
charger has stopped charging and
switched to the Maintain Mode of opera-
tion.
MAINTAIN MODE: When the CHARGED
(green) LED is lit, the charger has
started Maintain Mode. The charger will
monitor the battery voltage. When the
voltage drops to a predetermined level,
the charger will re-initiate a charge cycle
at the 2A rate.