


• 11 •
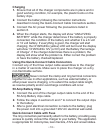
1. To permanently attach to a battery, loosen and remove each
nut from the bolt at the battery terminal.
2. Connect the red POSITIVE connector ring to the POSITIVE
battery terminal.
3. Connect the black NEGATIVE connector ring to the NEGATIVE
battery terminal.
4. Replace and tighten the nuts to secure.
5. Connect the cable to the end of the charger output cord.
Take care to keep the wires and plug away from metal and
moving parts.
6. Plug the charger power cord into a grounded 120V AC
electrical wall outlet.
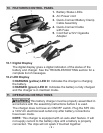
Cord Set with 12V Cigarette Adapter
Charge or maintain your battery without lifting the hood.
1. Connect the end of the Cord Set with 12V Cigarette Adapter to
the charger.
2. Insert the 12V accessory plug into the 12V accessory outlet.
3. Route the power cord from the charger through the vehicle’s
open window.
4. Plug the charger power cord into a grounded 120V AC
electrical wall outlet.
5. If the vehicle’s ignition key has to be on in order for the
accessory outlet to supply/receive power, turn the key on.
Battery Connection Indicator
If the charger does not detect a properly connected battery,
charging will not start and the digital display will show one of two
messages. If the display shows “CONNECT CLAMPS”, make sure
the charger is connected to the battery and the connection points
are clean and making a good connection. If the display shows
“WARNING CLAMPS REVERSED”, unplug the charger from the
AC outlet and reverse the connections at the battery.
Charge Completion and Maintain Mode (Float-Mode Monitoring)
Charge completion is indicated by the CHARGED (green) LED
turning on and the digital display showing “FULLY CHARGED
AUTO MAINTAINING”. This means that the charger has stopped
charging and has switched to the Maintain Mode of operation.