


• 12 •
Using the Battery Voltage Tester
Overview
This battery charger has a built-in voltmeter to test your battery’s state of
charge. The charger does not have a built in load tester. As such, a recently
charged battery could have a temporarily high voltage due to what is known as
“surface charge.” The voltage of such a battery will gradually drop during the
period immediately after the charging system is disengaged. Consequently, the
tester could display inconsistent values for such a battery. For a more accurate
reading, the surface charge should be removed by temporarily creating a load
on the battery, such as by turning on lights or other accessories for a couple
of minutes before you read the display. Read it a couple of minutes after you
have shut the headlights off.
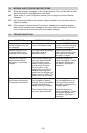
Testing Sequence: There are four basic steps required to test the battery
state of charge:
With the charger unplugged from the AC outlet, connect the charger to the 1.
battery following the instructions given in sections 6 and 7.
Plug the charger AC power cord into the AC outlet, following the 2.
instructions given in section 8.
If necessary, press the BATTERY TYPE button until the correct type is 3.
indicated.
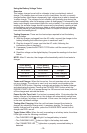
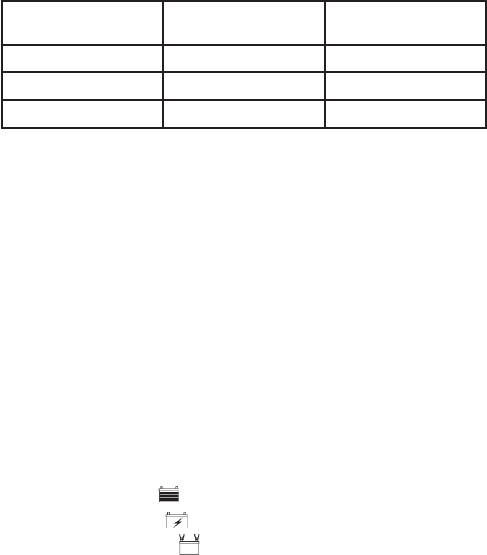
Read the voltage on the digital display. Compare the readings to the chart 4.
below.
NOTE: After 15 minutes, the charger will automatically switch from tester to
charger.
6 Volt Battery
Voltage Reading
12 Volt Battery
Voltage Reading
Battery Condition
6.4 or More 12.8 or More Charged
6.1 to 6.3 12.2 to 12.7 Needs Charging
Less than 6.1 Less than 12.2 Discharged
Tester and Charger:Whenrstturnedon,theunitoperatesonlyasatester,
not as a charger. To continue to use it only as a tester, avoid pressing the
CHARGE RATE button. Selecting a charge rate activates the battery charger
and deactivates the tester. Pressing the CHARGE RATE button when the
ENGINESTARTLEDislit(exceptduringthe180secondcooldown)willshut
off the charger and activate the tester.
Power-Up Idle Time Limit: If no button is pressed within 15 minutes after the
batterychargerisrstpoweredup,thechargerwillautomaticallyswitchfrom
tester to charger if a battery is connected. In that case, the charger will be set
to the start up default settings.
Testing After Charging: After the unit has been changed from tester to
charger(byselectingachargerate),itremainsacharger.Tochangethe
battery charger back to a tester, press the CHARGE RATE switch until all
charge rate LED’s are off.
Tester Status LEDs: When the unit is operating as a battery tester, the status
LEDs light under the following conditions:
The CHARGED LED • will light if a charged battery is tested.
The CHARGING LED • does not light in the battery test mode.
The • CONNECTED LED lights when a properly connected battery is
detected.