


9
HOW TO USE YOUR SPRAYER
BEFORE STARTING
It is important
to test the boom and spray gun with plain
water before using chemicals. This will enable you to
check the sprayer for leaks and to set the spray pattern
and nozzle pressure. If a leak should occur, thread tape
may be used to better seal the fi tting.
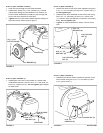
ON-OFF SWITCH
This switch is connected in line to the wiring assembly and
is used by the operator to turn the pump motor on or off.
PUMP PRESSURE SWITCH
The pump is equipped with a pressure switch. The
pressure switch senses outlet pressure of the pump
and will turn off the electrical power to the pump at a
predetermined high pressure point (60 PSI). If the fl ow
demand is very low, the pump may reach this high
pressure point and the switch will cause "cycling" (the
pump cycles on and off rapidly). This is not a problem
unless the pump is subject to continuous cycling within
one second intervals for long periods of time.
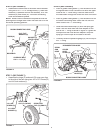
ADJUSTING OPERATING PRESSURE
The sprayer is equipped with a "Y" fi tting containing
a bypass valve and a boom valve. The bypass valve
controls the fl ow to the return (bypass) hose. The
amount of fl ow through the return hose determines the
operating pressure when the boom or the spray gun is
in use. Adjust the bypass valve while either the boom or
the spray gun is in use to obtain the desired pressure,
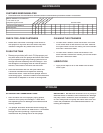
indicated by the pressure gauge. The tip chart on page
9 shows how different pressure settings affect boom
application rates.
ON-OFF ADJUSTMENT OF BOOM NOZZLES
The boom valve on the "Y" fi tting controls fl ow to the
boom nozzles. It should be either completely open or
completely closed. The boom operating pressure can be
controlled using the bypass valve on the "Y" fi tting.
ADJUSTING SPRAY GUN NOZZLE
Turn the nozzle on the spray gun to adjust the spray from
a cone shaped fi ne mist to a straight stream. Control
the spray gun operating pressure with the bypass valve
on the "Y" fi tting. Maximum spray gun pressure can be
attained when the boom is shut off.
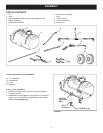
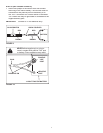
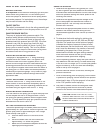
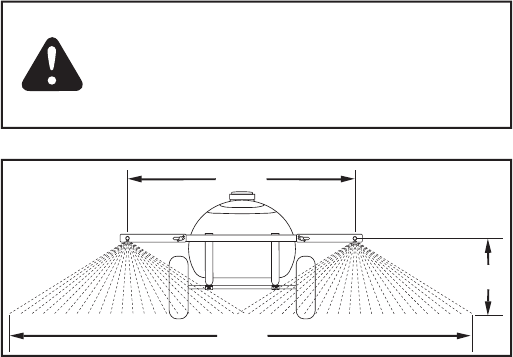
SETTING THE BOOM FOR SPRAYING
The correct positioning of the boom places the nozzles
approximately 40" apart and 14" above the ground. This
gives a spray width of approximately 80" with a slight
center overlap. See fi gure 11.
a. Slide the boom bars out to the ends of the
slots.
b. Swivel the boom bars until the nozzles are
approximately 14" above the ground.
c. Make sure the nozzles are adjusted so that the
openings point straight down.
CAUTION:
WEAR EYE PRO TEC TION,
GLOVES AND PROTECTIVE CLOTH ING
WHEN HAN DLING AND WORK ING WITH
LAWN CHEM I CALS.
FIGURE 11
80"
40"
14"
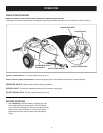
USING THE SPRAYER
1. Determine the application rate (gallons per 1,000
sq. feet or gallons per acre) based on the chemical
manufacturers recommendations. Use this rate to help
select the pressure setting and tractor speed in the
following instructions.
2. Determine the approximate square footage of the
area to be sprayed and estimate the number of
gallons required. This can help avoid unneeded
solution left in the tank.
3. Determine the appropriate speed at which to travel,
based on the chosen pressure setting and the
recommended application rate. Use the tip chart on
page 9.
4. To determine the throttle setting for attaining the
appropriate speed, mark off 100, 200 and 300 feet
intervals. The speed chart at the bottom of page 9
indicates the number of seconds it takes to travel
these distances. Set the throttle and, with a running
start, travel the distances in the number of seconds
indicated by the speed chart. Once you have
determined the throttle and gear settings needed,
mark the throttle location so that you can easily
resume the same speed after stopping.
5. Set the operating pressure. Spray with plain water to
help determine the best setting. For best results stay
in the 20 to 30 PSI range. (At 10 PSI the spray pattern
begins to break up, at 40 PSI some drift develops.)
Refer to the tip chart on page 9.
6. Add the chemical solution to the tank, following the
product instructions.
7. Drive to the starting place for spraying. Set the boom
in position for spraying. Set the throttle at the position
determined in step 4. Flip the sprayer's in-line switch
to the "ON" position to start spraying.
8. Stay clear of fl owers, shrubs and evergreen trees
when spraying weed control solutions to prevent
contact of the solution with these sensitive plants.