


L 1039-10|5
Putting the charger into operation
Putting the charger into operation
The charger can be:
• placed on a table or cabinet,
• installed in a 19" rack,
• fixedly installed in a cabinet or transport case.
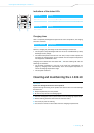
Installing the charger
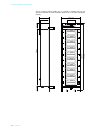
The housing of the charger is designed so that it fits into a 19" rack. The charger
can also be installed in a cabinet or transport case.
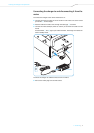
̈ Slide the charger into the 19" rack.
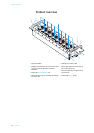
̈ Fasten the charger to the rack by screwing 4 screws through the 4 mounting
holes 4.
̈ Attach the mains unit to the rack (e.g. using Velcro tape) so that the mains
cables are not mechanically loaded.
CAUTION
Danger due to heat accumulation!
The charger and the receivers can get very hot during charging. If the heat cannot
dissipate, the products can be damaged.
̈ Provide sufficient ventilation so that the ambient temperature of the charger
does not exceed the temperature limit specified in the specifications (see
page 11).
̈ Keep the charger away from heat sources and never expose it to direct sunlight.
CAUTION
Risks when rack mounting the charger!
When installing the product in a closed or multi-rack assembly, please consider
that
• the ambient temperature within the rack may increase considerably,
• high mechanical loading may occur, e.g. acting on the housings and cables,
• intrinsically harmless leakage currents of the individual mains units may accu-
mulate, thereby exceeding the allowable limit values.
This can cause material damage and electric shock.
̈ Make sure that the mechanical loading of the rack is even.
̈ Make sure that the ambient temperature within the rack does not exceed the
temperature limit specified in the specifications (see page 11). Ensure sufficient
ventilation; if necessary, provide additional ventilation.
̈ When connecting the charger to the mains, observe the information indicated
on the type plate. Avoid circuit overloading. If necessary, provide overcurrent
protection.
̈ Ground the rack via an additional ground connection.